Google
 

The Ultimate Guide for switching from a PC to a Mac
(Part 2 - coming soon)

Friday, November 30, 2007

Dragging windows from one app in Spaces!

This is a Leopard only tip. I already presented many Spaces tips when Leopard came out, but there is even more. Many of these tips showed how to move windows from one space to another, but there was never a way to move all the windows from a specific application at the same time. It is possible when you drag it in the F8 window. Here is how:

1. Hit F8 to see all the Spaces.
2. Instead of dragging all the windows (considering all the windows are in one space) from a specific application one by one, hold down "Shift", click on a window of this application
and drag it to another space. All the other windows from this application that are in the same space will follow!

Thursday, November 29, 2007

The easiest way to use Safari's new search feature!

This tip works with both OS X Leopard and Tiger. Safari 3 is required with Tiger though. In previous versions of Safari and in other browsers such as Camino and Firefox, when you bring up the Find window with "Command - F", you can then get rid of it by hitting "Esc". The new improved Find in Safari 3 doesn't work in the same way. It is much better than before, really highlighting what you are looking for, but at first glance, there is no way to get rid of it quickly. There is a shortcut however. It is "Shift - Command - F". It will instantly hide the search field.

Edit: Weird, "Esc" didn't work for me at first, but after people start posting about it in the comments, I tried it again and it worked. I guess I can add more to this tip. There are other shortcuts. When you do the search, the first result will be highlighted in yellow. All the other results are in white. If you want to see the next one more clearly, you can use "Command - G" to highlight the next one in yellow. "Shift - Command - G" will move backwards.

Wednesday, November 28, 2007

Much more info about zooming in Quick Look!

I posted a tip last week about how it is possible to zoom in Quick Look using "Option - Click" and unzoom with "Shift - Option - Click". It didn't work for a lot of people. I finally figured out why and I also found another way that is even faster. So the shortcut "Option - Click" only works with images such as Jpeg, Tif, etc. The even faster way of zooming in on images is to hold down Option and scroll with your scroll mouse. If you want to zoom in on a PDF, the shortcut is different. It is "Command +" to zoom and "Command -" to unzoom (it is most likely different depending on the keyboard layout you use). I really don't understand why Apple didn't choose a standard way of zooming in Quick Look no matter what you are looking at, but that's the way it is.

Tuesday, November 27, 2007

A recent items stack hidden in the OS!

A great tip submitted by Rohit Deshpande (who got it from macosxhints.com): A recent items stack hidden in the OS! Wow, when I received it, I was really impressed. It is unfortunately Leopard only. It is a stack for Recent Applications, Recent Documents, Recent Servers, Favorite Volumes and Favorite Items. It works great and it is truly well integrated because it is built-in the OS, just not enabled. I assume the reason Apple didn't enable it is because they didn't think it was stable enough. It seems to be working just fine though. Here is how to get it:

1. Open Terminal. (/Applications/Utilities/Terminal)
2. Paste this following line in Terminal (it is one long line):

defaults write com.apple.dock persistent-others -array-add '{ "tile-data" = { "list-type" = 1; }; "tile-type" = "recents-tile"; }'

3. Restart the Dock by entering (the capital D is required):

killall Dock

4. Here is a video screenshot from Rohit showing how it works:


5. You can get more of these stacks by doing the same procedure again. To remove it, simply drag it off the Dock.

Thanks for the tip Rohit and macosxhints.com!

Monday, November 26, 2007

Dashboard when screen sharing!

A great tip submitted by Dominic P. Tremblay: Dashboard when screen sharing! I always use the F12 shortcut to launch Dashboard, because I think dragging the mouse to the Dock to click on the icon is so much longer. I finally found why the icon is useful though. When you are using Leopard's new screen sharing feature, pressing on F12 will launch dashboard on your own Mac even if you mouse is in the shared screen window. The only way that I found to open Dashboard on the remote Mac is to click on the icon in the Dock. Thanks for the tip Dominic!

Sunday, November 25, 2007

Dragging a file from the Finder to Safari!

I found this tip at MacWorld.com and I was so impressed, I had to share it with you. This tip works in both Leopard and Tiger. You must have Safari 3 installed if you are on Tiger though. When you are filling out an online form and you have to upload a file, there is often a "Choose File" button. When you click on it, you get a window similar to the open/save window where you can choose the file. You often have to go through many folders before getting to the right file. In Safari 3, it is much easier. You can drag a file from the desktop or anywhere in the Finder, all the way to the "Choose File" button.


Thanks for the tip MacWorld.com!

Saturday, November 24, 2007

Open in with the Command-Tab!

Okay, I know I said in the comments I was going to have a Tiger and Leopard tip for tonight, but I had so many problems uploading the video that it is not ready. It is the kind of tip that is really ten times more obvious with a video. I hope it will work for tomorrow.

In Leopard, instead of right-clicking on the file to choose "Open With", you can easily drag the file to a currently running application in the "Command-Tab" dialog. To do this, you first click and hold the file as though dragging it. You then bring up the Command - Tab and once it appeared, you drag the file to the application you want to force the OS to open it with. This is useful, because when you drag it to the Dock, it is often not recognized as a recommended application, but Command - Tab won't check that.

Friday, November 23, 2007

Customizable grid spacing on the Desktop!

This is a Leopard only tip. If you bring up the View Options with "Command - J" or by choosing "View" and "Show View Options" in the Finder, you will find out that it got many new features in Leopard. One of them, when you are on the desktop, is Grid Spacing. I think that is really cool because it has always been something that bothered me (I used to think the way icons are displayed is better on Windows, not anymore!). I think the way it is by default puts the icon on the desktop not close enough to the edge. When you have multiple rows, I think the spacing is a bit too large. By adjusting the grid spacing, you will also be able to have more icons on the desktop before it looks cluttered. Here is an example:

Thursday, November 22, 2007

Zooming in Quick Look!

This is a Leopard only tip. There is no obvious way of zooming in when checking out a pdf or an image in Quick Look. It is possible however. To do so, simply open a pdf or an image in Quick Look, hold down "Option" and click anywhere on the file. To zoom out, use "Shift - Option - Click". It also works in full screen. It is very useful because I thought at first that there was no way to see it bigger than full screen.

Wednesday, November 21, 2007

What is wrong with the Finder Coverflow!

Okay, this is not a tip. I just want to show you what I think is the biggest annoyance in Leopard. Apple might not see it as a bug, but I hope it is a bug that will be fixed in 10.5.2 (or Apple could at least add a preference). It is about Coverflow, but I want to say first that I really like coverflow. I am really bad at naming files and just seeing visually what I am looking at is so much better. Coverflow gets annoying however, when you resize a window. Here is the problem:

I start with a small Finder window. Coverflow takes up about 50% and the list the other 50%. I want to see more in the list, I resize the window, making it bigger. The only thing that gets bigger is coverflow. If I want a bigger list, I have to resize the window and then resize coverflow. I think the way Apple should have implemented this is that it should keep the same ratio before and after the resize. In this case, I had 50% for one and 50% for the other. I would have expected both coverflow and the list to increase in size by the same amount. Here is a video screenshot showing the problem:


What do you think? Is it a bug or a feature?

Don't forget to check out the tip posted earlier today.

An unknown way of adding an application to the Dock!

Okay, that seems like an easy thing to do, but there is a much quicker way than the way most people do it. The two ways most people use to add an app to the Dock is to either drag it from a Finder window to the Dock or click and hold its icon in the Dock (when it is loaded) and choose "Keep in Dock". I previously used the slow "click and hold" method. The way that works much better is to simply move the icon to another place in the Dock when it is loaded. It will automatically add it to the Dock.

Tuesday, November 20, 2007

Hierarchical stacks!

Stacks was presented as a new Leopard feature, but it is really a polished version of what was already in Tiger. It did get some improvements: you no longer have to click and hold, the overall look is better, etc. It also lost a feature however. It is no longer possible to browse through the folders in a hierarchical way. There is a new application called HierarchicalDock that modifies this behavior and lets you go back to a more Tiger-like way of handling stacks. You can download HierarchicalDock here from MacUpdate.

Screenshot from MacUpdate:

Monday, November 19, 2007

Sorting color labels in the Finder!

In the Finder, you can sort files by Name, Date, Size, Kind, etc, but there is no way of sorting both by name and color labels. I think that could be very useful. I could add a color label to the edited files and have them move to the top by default. There is a way of doing something similar though. It is by renaming the files with a symbol in front to make them go to the top. I find this useful, but I think it always looks odd with the weird symbol. I finally found a symbol that makes sense however. On the US keyboard, you can get it with "Option - 8" and it is "•". What really makes me like it is that it is the same symbol than the one that goes besides new podcasts in iTunes. With this, I get two alphabetical lists, the one with the symbol and the one without.

Sunday, November 18, 2007

SMS from iCal!

A great tip submitted by Grant Reeder: SMS from iCal! iCal is great if you have an iPhone or another phone that syncs with iCal, but many phones are not easy to sync on the Mac. iCal alarms have many options including the ability of sending out emails, but what if you don't have a Blackberry or another great email device. It doesn't look like there is any text message option in iCal, but it is easily done. Most cell phone carriers nowadays provide you with an email address that when you send something less than 160 characters to this email address, you receive it as an SMS. What you have to figure out is what it is for your carrier. So you can use the built-in email function to send the reminder to your phone as an SMS. The only requirements are that you use Mail as your email client and that your computer is not asleep when it has to send the email. Here is a list of US and Canadian carrier SMS emails (you can find this info for most carriers by searching on Google) (please check with your carrier for additional fees):

AT&T: (yourPhoneNumber)@mms.att.net
Sprint: (yourPhoneNumber)@messaging.sprintpcs.com
T-Mobile: (yourPhoneNumber)@tmomail.com
Verizon: (yourPhoneNumber)@vtext.com

Bell: (yourPhoneNumber)@txt.bell.ca
Fido: (yourPhoneNumber)@fido.ca
Rogers: (yourPhoneNumber)@pcs.rogers.com
Telus: (yourPhoneNumber)@msg.telus.com

Thanks for the tip Grant!

Saturday, November 17, 2007

Changing the look of your Dock!

A great tip submitted by Nessuno: Changing the look of your Dock! There was a tip previously about how to get back the 2D look of your Dock on Leopard. That is great if you want to get back the "Tiger look", but what if you want to keep the 3D dock, but with more customization options. I know a lot of people are afraid of modifying the OS, because it could cause problem with later updates (Application Enhancer was problematic with the Tiger to Leopard update). I think this is different though, because the only thing you are doing is changing the images of the Dock. Here is how it is done:

1. Download or create in Photoshop the new look of your Dock. You can find many new looks at http://www.leoparddocks.com/
2. Go to /System/Library/CoreServices/
3. Right-click on "Dock" and select "Show Package Contents".
4. Go to /Contents/Resources/
5. Backup the file you are about to replace in case you want to go back to the original Dock style. You can do this by comparing the files you downloaded to the ones in this folder.
6. Move the files you downloaded to that folder.
7. Open Terminal and enter "killall Dock" (without the quotes).
8. View your new dock!

Nessuno's Dock:


Thanks for the tip Nessuno!

Friday, November 16, 2007

Changing the login background!

A great tip submitted by Nessuno: Changing the login background!  In Leopard, even if you change the default space theme background, you will still see this default background when you log in.  The reason for that is that with multiple accounts, each account probably has a different background, so the OS keeps the default background as the login background.  If you are the only one using your computer, you might want to customize that however.  It is possible to do so by fooling the OS into thinking that it is the default background.  Here is how:

1. Make a copy of the background you want and rename it to "DefaultDesktop.jpg".
2. Go to /System/Library/CoreServices and find the file DefaultDesktop.jpg.
3. Store the file somewhere on your hard drive in case you want to go back to the original default background.
4. Place your new background called "DefaultDesktop.jpg" in the folder /System/Library/CoreServices.

Thanks for the tip Nessuno!

Thursday, November 15, 2007

Opening a file in a specific app from a Stack!

One of the things that bothers me about the way Stacks are handled in 10.5 is that you cannot right-click on a file to choose in which application to open it. To do this, you first have to click "Show in Finder" in the Stack and then right-click on the file. There is a faster way of doing it if the application that you want to open it with is in the Dock however. Here is how:

1. Click on the stack to open it.
2. Click and hold on the file.
3. Drag the file from the stack to the icon of the application on the Dock.
4. If the application becomes highlighted, it will open it without a hitch. If it doesn't, it means that the application is not a recommended application for this type of file. It is possible to force it to open the file by pressing "Option - Command".

By the way, Apple released many updates today. Updates are available for OS X 10.4 Tiger, iPhoto '08 and Final Cut Studio 2.

Wednesday, November 14, 2007

Renaming photos in batch processing!

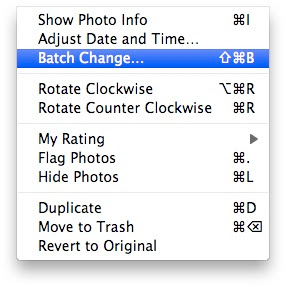
I never feel like it is important enough to take the time and rename photos, or add description info. It makes a huge difference when it is done and you want to search through your photos however. The real only way of speeding up the process is to do some batch renaming. It is possible right in iPhoto. There is also a way to add a description to multiple photos at once. Here is how it is done:

1. Select the photos.
2. Go to "Photos" and choose "Batch Change...".
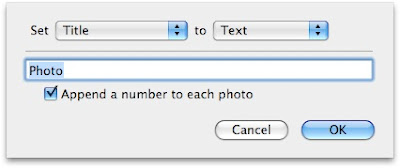
3. Select if you want to change the title or the description.

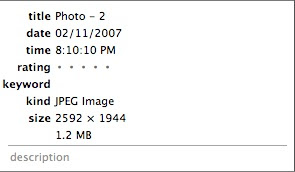
When changing the title, a necessary option is there. It is "Append a number to each photo". Here is the result.

That is where you get the Batch Change:

The options:

The result:

Tuesday, November 13, 2007

Notes and emails with Quick Look!

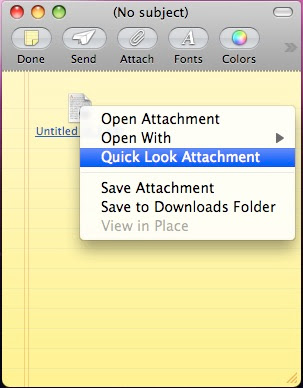
One thing that I really like about Quick Look is its tight integration all through the system. It is even possible to highlight an attachment you received, hit spacebar and navigate through it in Quick Look. I sometimes wish the same was possible with an email I am sending and with Notes. There is a way of getting similar results though. Highlighting it and hitting spacebar doesn't work, because it is in edit mode, so it replaces the file with a space. The way you can do it is by right-clicking on the attachment and choosing "Quick Look Attachment".

In a note:

Monday, November 12, 2007

Searching with a "not" in Spotlight!

One thing that is weird about Spotlight is that it only seems to accept positive searches.  You cannot say "contains" this and "doesn't contain" this.  

The only option for "Contents" is "contains":


The same thing happens with "Name", there is "contains" and "is", but there is no "doesn't contain" and "is not":


The way around this that I found is to choose "contains" and to add a "-" in front of the word.  So if you search for "Contents" "contains" "application -ical", it will search every file and document to find where it is written application, but it is not written ical.  Make sure that there is no space between the "-" and the word or it won't work.  That is the only way I found, but I think it is still an issue because the option of excluding files or names is not obvious and the "-" is not explained in the Finder help file.

Sunday, November 11, 2007

Monitoring your Ram and making sure you have enough!

Activity Monitor is a very useful tool in ensuring that the quantity of Ram you have is not what is slowing everything down.  With the powerful computers we have today, the two things that can be a huge slowdown is an hard drive without enough free space and not enough Ram.  You should always have at least 10% (or 10 GB for smaller hard drives) of free space.  Not enough Ram also slows everything down, because the OS will constantly swap data to the hard drive and the hard drive is slow.  Here is what Activity Monitors tells you about your Ram:


There are four categories: Free, Wired, Active and Inactive.  What is actually being used now is Wired and Active.  The sum of Free and Inactive is what is unused.  You might want to consider having enough Ram so that you don't have to use the Inactive memory, because Inactive memory often adds a lot of speed.  What is stored in Inactive memory is the data of an application that was running previously.  That is why it is always faster to load an application the second time.  This is exactly what Apple does when presenting their software.  They load it once, quit it, and load it again in front of the camera.  It looks much snappier the second time because everything is still stored in the Ram.  To really understand if you need more Ram, you'll have to look at the "Page outs".  Page outs are data that had to be transferred to the hard drive because the OS ran out of Ram.  It is normal to have some Page outs if your computer has been running for a while, because the quantity of Page outs is only reseted when you restart.  The best way of seeing what is going on is to leave Activity Monitor running and watch it while working.  When you have many applications running and you see that it is accumulating a lot of Page outs, it is safe to say that more Ram would probably speed things up a lot!

Saturday, November 10, 2007

A preview saved in iWork files!

This tip is for both Tiger and Leopard.  There is a checkbox in the Save dialog of Pages that I wondered for a while what it actually did.  It is "Include a Preview in document".  Before Leopard came along, I was wondering whether that was required for QuickLook to display it, but it is not.  I finally figured out that what it does and it is that it includes a smaller PDF version of the document in the file.  It makes the file larger, but it can be useful.  After checking it out closely, I noticed that it does make a difference in QuickLook.  Here is the difference:
The original document:


The way it looks without preview:


With preview:


The option in the "Save" dialog:


So what I understand from that is that the QuickLook plugin for iWork is not perfect and won't display logos and such.  The PDF plugin is much better.  The feature could also be useful on a PC.  On a Mac, it is easy to access the saved PDF by right-clicking on the Pages file and choosing "Show Package Content".  The PDF called Preview is then in the QuickLook folder.  I don't know how this could be done, but on a PC, if there was a way of accessing the "Package Content", you could simply look at the PDF (because you wouldn't be able to read a Pages file).  If you always want to save PDF previews in your documents and don't want to have to think about it (hard drive space is so cheap nowadays), you can do it by checking "Include preview in document by default" in Pages preferences.

Friday, November 9, 2007

Enhanced printing as PDF!

There are numerous enhancements that were made to the "Print as PDF" dialog in Leopard. Let's look at what this actually means to us. This is the new dialog:


The new feature that I like the most in this is Keywords. This will actually add metadata to your PDF file. Metadata is often used in files such as RAW to record the information of the camera. In the case of PDFs, keywords in the metadata should actually give you better Spotlight results. My understanding of Spotlight is that the metadata is considered more reliable than the actual data when sorting the results of a search.

Document stack icon!

This is an icon that you can use for the document stack using the tip posted yesterday. Thanks Matt Giese for sending this in:

Thursday, November 8, 2007

Icons for the stacks!

Here are more icons that you can use with the tip posted earlier today about Stacks icons.  Thanks to Rodrigo Arano for sending them in!


For Downloads:


For Applications:


Changing the icon of Stacks!

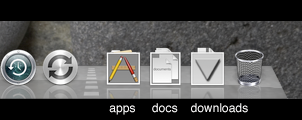
This is a Leopard only tip from Nelson Oliver: Changing the icon of Stacks! The icon of Stacks doesn't tell you much about what it actually links to. It is sometimes hard to figure out which one is the document stack and which one is the downloads stack. There is a workaround however. You must first create icons that you want to set as the stacks icons.

1. Rename the icons to names such as "0apps.png", "0docs.png" and "0downloads.png".
2. Put these icons in their respective folders.
3. Change the way stacks are sorted in "Sort by" to "Name". This will make sure that the icon you choose will always be on top.
4. That's it! The icon displayed will now be the png you chose.

Changing the way stacks are sorted:


The icon Nelson chose for downloads:


The results:


Thanks for the great tip Nelson!

Wednesday, November 7, 2007

Layers in Photoshop!

This tip is for both 10.4 Tiger and 10.5 Leopard (it probably also works on the PC version, but I don't know the shortcut!). The layers in Photoshop is really what makes this application so powerful. When you are working on a multi-layer project, you often switch the visibility on and off to get an idea of what is changing. There is a way that lets you quickly switch a bunch of layers to visible or not visible. It is done by holding down "Command" and clicking on the button that turns it off and dragging down to make them all not visible. It is somewhat hard to explain it like this. You'll get a much better idea from this video screenshot:

Tuesday, November 6, 2007

Wikipedia in the dictionary in many languages!

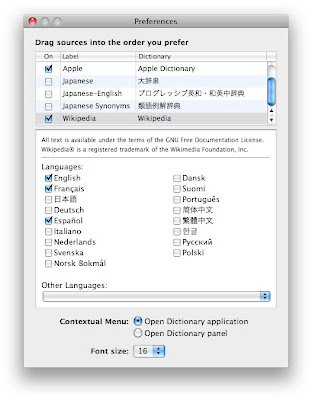
When you open the built-in Dictionary in Leopard, you will notice that you can now access Wikipedia right there in the Dictionary application. That is a great feature, but by default, you get Wikipedia in the language of your OS. It is however possible to change it to another language or even to add other languages.

1. First, go to Dictionary, Preferences.
2. Scroll down to Wikipedia and click on it.
3. Select the languages you want. You can find many more in "Other Languages".
4. That's it!

The Wikipedia preferences:


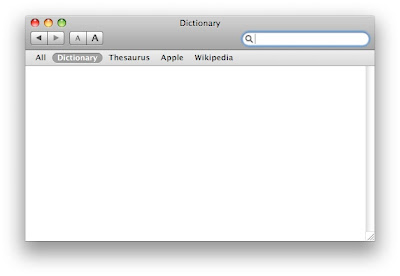
Before:


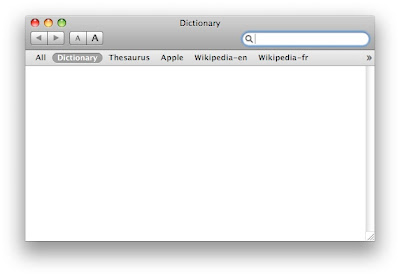
After:

Monday, November 5, 2007

A 2D or 3D dock!

A lot of people complained about the look of the new 3D Dock, but even more so, of the lack of choice for the look of the Dock. The side dock was supposed to be 3D as well, and it only changed in the Gold Master. What is great is that every time people are unhappy about the look of the OS, a third-party application solves everything and this time is no exception. It is called CustomDock. It is a very simple application that lets you switch from a 3D dock to a 2D dock and vice versa. From what I understand, it should also let you get a side 3D dock (I am not sure, I haven't tried it, I really like the new Dock!). You can get more information and download CustomDock here on MacUpdate.com

Sunday, November 4, 2007

New window in Leopard but not in Tiger!

I already mentioned a feature that lets you go anywhere in the path of a folder in the Finder.  It is by holding down "Command" and clicking on the title of the folder in the Finder window top bar.  The path pops up and you can choose exactly where you want to go back.  Once the path pops up, whether you keep on holding Command or not in Tiger, the result is the same.  It redirects you to the folder that you chose.  In Leopard however, you have to release the Command key before selecting where you want to go or it will open it in a new window.  I think the way it works in Leopard makes more sense, at least you have the choice of getting it in a new window or not.  I just wasn't used to it and I kept getting new windows, but now I know!

Saturday, November 3, 2007

Opening applications in specific Spaces!

This is a great tip submitted by Nessuno and yes, of course, it is about Spaces.  What this lets you do is that once you have established your workflow in all separate Spaces, you don't want to have to reestablish that every time you restart or you quit applications.  This lets you assign specific applications to specific spaces.  

1. Open System Preferences and click on "Expose and Spaces".
2. Click on the Spaces tab.
3. You will see a large white box and right under it, there is a "+" and a "-" button.
4. Click on the "+" to add an application and navigate through your applications folder to select the application you want to assign a space too.
5. The white text box should now have that application automatically assigned to "Space 1".
6. That's it!  You can just continue to add applications and select the number that corresponds to the space you want that application to open in.

Thanks for the great tip Nessuno!

Friday, November 2, 2007

An application stack!

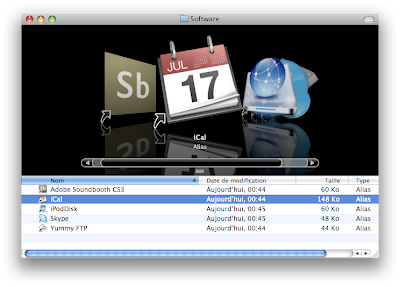
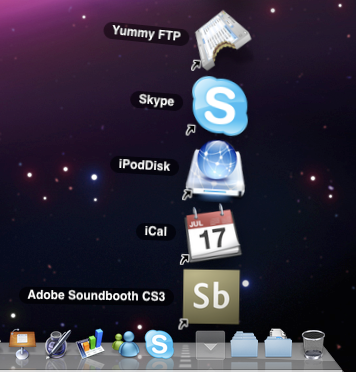
The Dock is great for applications that you use very often, but it is not realistic to have every application in the Dock.  Going to your applications folder just to launch one of those application that you use less often is also a pain.  I thought the solution was to just drag the applications folder to the Dock and use it as a stack, but unlike in Tiger, icons in stacks are displayed too big to really be efficient with a huge number of files.  The grid would just fill up my whole screen, making it a not very practical way of looking at it.  What I really wanted was a way to pick the apps I wanted in the stack.  I didn't want apps to appear both in the dock and in the stack.  Dragging the apps out of the applications folder was not really an option either.  The solution is however quite simple:

1. Create a new folder and put it wherever you want on your computer.  
2. Open both the new folder and the applications folder in separate Finder windows, side by side.
3. Drag the applications you want in your stack to the new folder but while holding down "Option - Command".  An arrow should appear when you are dragging it, meaning that you are not actually moving anything, just creating aliases.
4. Once you have aliases of all the applications you want, drag the new folder to your Dock, beside other stacks.
5. That's it, you can now use this stack to launch applications that are not used as often.

The folder:

The result:

Thursday, November 1, 2007

More cool things with Spaces!

I received many of these by emails from many different people and also through the comments. I won't name everyone, because it would just be too long. So basically, it is a few more ways of using Spaces more efficiently. The F8 shortcut is flashy, but I find it too slow to be useful in a workflow. That's why I really started liking Spaces when I realized I could switch space by switching application with Command-Tab. So here are a few ways of moving an application from one space to another without resorting to F8.

1. You can take the window of an application and move it to the edge of your screen. It will bring the application in the next space (if you bring it to the right edge, it will move it to the next space at the right). I really liked it when I found it, but I like the next one even better because it doesn't require as much use of the mouse.

2. The other way is to click and hold the window of the application and switch to the other space using the "Ctrl - 1", "Ctrl - 2", etc (the number corresponding to the number of the space you want to go to). The application will follow.

Thanks to everyone who sent this in!
Brain Toniq. Clear the head fog
Pay Per Click Ads by pay per click advertising by Kontera