Google
 

The Ultimate Guide for switching from a PC to a Mac
(Part 2 - coming soon)

Monday, December 31, 2007

Frame numbers in QuickTime!

If you edit video and want precise edit, the only way of doing that is with a specific frame. Seconds are not precise enough because there are 24 to 30 frames per second. It is possible to have QuickTime display frame information instead of minutes and seconds. To do that, click on the time at the left of the timebar and choose "Frame number". You can easily switch back to Standard at anytime.

Sunday, December 30, 2007

Using "Add to Queue" in Handbrake

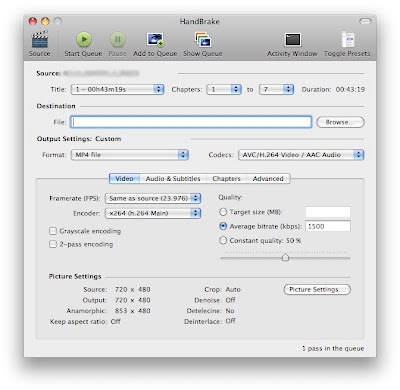
Handbrake is a free application that lets you converts DVDs to H.264 QuickTime files that are compatible with iPods, iTunes and Apple TV (or simply for watching on your Mac, but while reading from the hard drive). Encoding to H.264 can take a while, especially if you Mac is not the latest and greatest. My MacBook encodes at about 24 frames per second (real time) and my Mac Pro does it in about half of real time (50 - 60 frames per second). The "Add to Queue" feature can be really useful when you are encoding a DVD with multiple TV shows or you are on a computer that has more than one optical drive. That way, you'll be able to create a list of tasks to do and Handbrake will work the whole list without you having to change the settings again. I found another way of using it however. You can set all the settings and get everything ready and instead of pressing "Start", you press "Add to Queue" (even for the first one). You can then do other stuff and when you are ready to leave your Mac encoding, you are ready to press play without having to go through the settings.

The play button automatically switches to "Start Queue" when you added tasks to the queue:

Saturday, December 29, 2007

Merging all windows in Safari!

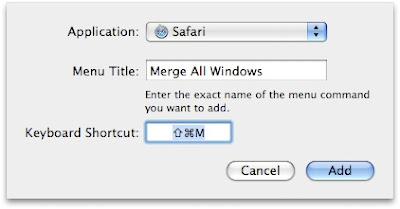
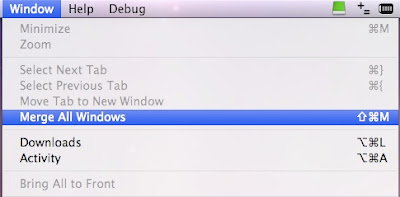
This should work in both Mac OS X Tiger and Leopard (Tiger requires Safari 3.0). One thing that tends to happen when browsing the web for a while in Safari is that even though I can open new tabs, I always end up with new windows. It is possible to merge all windows into a single window with many tabs. To do that, you can simply use the feature Merge All Windows that is located in the Window menu. The problem with this feature is that it has no keyboard shortcut assigned. It is however possible to assign a specific keyboard shortcut using System Preferences:

1. Open System Preferences and Keyboard & Mouse.
2. Click on the "Keyboard Shortcuts" tab.
3. Click on the "+" to add one.
4. Select "Safari" for the "Application".
5. Enter "Merge All Windows" as the Menu Title.
6. Choose the keyboard shortcut you want.


Friday, December 28, 2007

New effects for Photobooth and iChat!

This tip requires Mac OS X Leopard.  Apple released many new iChat and Photobooth effects in Mac OS X Leopard, but it would be cool to have even more.  There is a great third-party application that adds 48 new effects.  According to the developer, it works for G5 and Intel powered Macs (some G4 might be supported).  The integration is great.  Once installed, it works and looks just like effects from Apple.  The collection of effects is called "More iChat Effects 1.2" and can be downloaded here from the Apple site.

Thursday, December 27, 2007

Even more power in screen sharing, is that even possible?

Thanks to Hunter for pointing this out in the comments of the previous screen sharing tip and to MacWorld.com for the original tip. It looks like another command can give you a lot more power. It will let you control the remote computer while displaying a lock icon on a black background on the display of the remote computer. You will also be able to either control or simply observe the remote Mac. Another great feature is the possibility of going full screen to really make you feel like you are on the other Mac. Here is the command that you need to paste in Terminal to get these additional features in the toolbar of screen sharing:

defaults write com.apple.ScreenSharing \ 'NSToolbar Configuration ControlToolbar' -dict-add 'TB Item Identifiers' \ '(Scale,Control,Share,Curtain,Capture,FullScreen,GetClipboard,SendClipboard,Quality)'

Screenshot from MacWorld.com (I'm on the road and I only have one Mac):

Wednesday, December 26, 2007

Drop zones in iDVD!

This might also work with iDVD 06, but I am not sure. I only used it in the latest version. There are two views in iDVD, the standard view and the hierarchical tree view. The hierarchical view will let you easily manage menus and submenus. But that is not what I want to talk about. What is not obvious is that you can double-click on the background (in standard view) and the background will move backwards in 3D. You will then clearly see every drop zone and what is in it. Here is an example:

Tuesday, December 25, 2007

Sending iCards in bulk!

I might be a bit late with iCards, but they are still useful for birthdays and tons of other occasions. The thing is that sending cards one by one can take hours. Sending them in bulk looks really weird. There is a great option on the Apple iCards website however. It is "Hide distribution list". You can then compose a message that fits for a few people and save a lot of time. The ones receiving it will never know it was sent in bulk.


iCards is a service of dotMac but is offered free by Apple even if you don't have a dotMac account. You can check it out here.

Monday, December 24, 2007

Restart or not?

If you want to run software update but don't want to restart your computer now, you have to check to see if the update requires a restart. It is not obvious at first, but the grey icon at the left of the update tells you if it requires a restart. When the icon is there, you need to restart after doing the update. In general, Security, Mac OS X and QuickTime updates require a restart.

Sunday, December 23, 2007

Disconnecting the remote computer in screen sharing!

I know I talk a lot about screen sharing, but I think it is one of the best feature in Leopard and it really changed the way I use my Macs. One thing that I had never noticed until today is that a new icon actually appears in the menu bar of the remote computer when you are using screen sharing. It doesn't really let you do much, except for giving you the possibility of stopping screen sharing. It might be useful especially if your computer is on a large network. This is what you get in the menu bar:

Saturday, December 22, 2007

Grouping and ungrouping images in Pages!

When you are working on a document with multiple images, it is sometimes useful to be able to move the images as a group. It can be especially useful when you create a header made out of multiple images. There is a feature that you can add to Pages toolbar that will let you do that. To get it:

1. Right-click on the toolbar and choose "Customize Toolbar...".
2. Add "Group" and "Ungroup".
3. When you select two images, click "Group" and they will now move and behave as a single image.

Friday, December 21, 2007

Mail in a more widescreen way!

This applies to both Tiger and Leopard. The Mail application is great, but it could offer more when it is used on a widescreen display. It would be nice to be able to use the whole height real-estate to read the email. It is possible to change the look of Mail so that it appears as three columns. An easy way of doing this is with the Mail plugin called Letterbox. What I really like about this plug-in is that the DMG file where you install the plug-in also includes "MailPluginManager". It is then very easy to uninstall these plugins in the future. You can learn more or download this application here on MacUpdate.

Thursday, December 20, 2007

Tip #2: Transferring files to iDisk!

Don't forget to check out the tip posted earlier today. This tip is for .Mac users. If you use .Mac, you know how slow transferring to iDisk is. It is normal for transfers to take a while because the upload speed of your DSL or Cable connection is much slower than the download speed. In the last few days, when I transferred to iDisk, the Finder actually crashed. The problem with the long transfer is also that the Finder doesn't give you any idea of how much more time it will take. Let's say I transfer a 25 MB file, it instantly says "25 MB of 25 MB copied (closing file)" and that step lasts forever. The best solution I have found is to use ForkLift (part of the MacUpdate bundle). ForkLift actually offers iDisk transfers. In my experience, the speed is very close to an FTP transfer and it actually has a progress bar (unlike the Finder).

Screen sharing, an application!

This tip applies to Leopard only. The first time you use screen sharing on your network, you will quickly notice that it actually loads an application. The first thing I thought was how great it would be to be able to load the app from the Dock and select from a list of Macs on my local network. The code for doing this is actually right there in the application, just not enabled. You can first drag the application to the Dock. The application called Screen Sharing is located in System/Library/CoreServices. Once you load it though, it is only possible to choose a computer by entering its exact name. That's not very efficient. Here is how you can change this behavior:

1. Close Screen Sharing and open Terminal.
2. Copy/Paste the following line in Terminal:

defaults write com.apple.ScreenSharing ShowBonjourBrowser_Debug 1


3. Reload Screen Sharing. You should be greeted by a list that looks like this:

Wednesday, December 19, 2007

Review: Pulp Motion!

Don't forget to check out the tip posted earlier today. Pulp Motion is an application that lets you create animations with photos and one of the 35 included templates. It is a shareware that is currently part of the MacUpdate bundle. The MacUpdate bundle now includes 13 applications (Rage MapDesign added today) and is available here. I wasn't really expecting much from this application, being used to the advanced pro apps, but I think it is one of the apps in the bundle that I use the most. It is a solid application with lots of customization options. I was working last week on a slideshow DVD in DVD Studio Pro. I was doing an hybrid disc with both a regular version and an HD version on the same DVD. I didn't use any animations in the main slideshows, because I wanted to keep a simple look. I was however able to create a great intro animation that loads right before the menu. The export features are very elaborate, offering presets for iPod, iPhone and Apple TV, while also offering advanced Quick Time export. I think the only negative point I see with this app is the lack of third-party templates. I would say overall that it is a 4.5/5.

Screenshot from MacUpdate:

Controlling other apps with the Apple remote!

The Apple remote is now included with most new Macs and the reality is that it could serve many other purposes. It currently works with Front Row, iTunes and Keynote (maybe more, I am not sure). There are many other applications where it would be useful. One in particular is PowerPoint. There are a few third-party applications that can customize the system to make this happen. A free one that I like is iRed Lite. You can get more info or download it here from MacUpdate.

Here is how it works (from the developer):

Red Lite can be activated by holding down the Menu button on your Apple Remote. To switch to another layer, QuickTime e.g., simply hold MENU for a second, then navigate through the sections using the right/left buttons on your Apple Remote, then press MENU once. That simple!

Tuesday, December 18, 2007

The new mosaic screen saver!

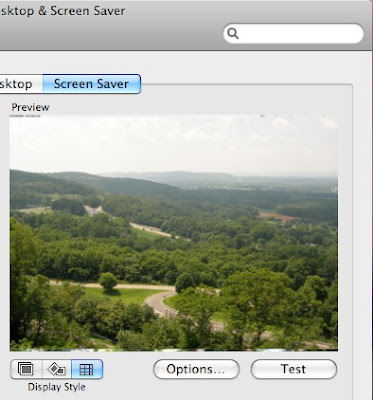
This is for Leopard only. It was always possible, even in Tiger, to display pictures from your iPhoto library as a screensaver. There is a new way called mosaic that looks really awesome. It basically starts with one image and slowly unzoom to reveal many other pictures right beside. After a few seconds, you'll realize that the first image is really a pixel of a larger image. The larger image will then slowly get sharper and the process starts again. To check it out:

1. Open System Preferences, Desktop & Screen Saver.
2. Choose an iPhoto screen saver.
3. As the display style, select the one at the right called mosaic!

Monday, December 17, 2007

Tip #2: Things, a to-do application!

Don't forget to check out the tip posted earlier today. This is really more a review than a tip and it is about the new to-do application called Things. It is currently in alpha testing, but MacUpdate added the alpha preview to the promotion bundle today. If you already bought the bundle, you can download it now and if you haven't bought it yet, it is still available here on MacUpdate. Here is my review of Things:

I really didn't understand the point of this app at first. I thought that we already had everything we needed with to-dos in Mail. The truth is that I never once used to-dos in Mail, but having it totally separate, I started using it (I'll see if it goes on!). The interface is very intuitive and it has the "shiny" iTunes look. I haven't found any bug yet and it seems very solid for an alpha version. Another thing is that deleting works like in iPhoto, it goes in a separate Trash for this application. Emptying the trash is not obvious because it is not possible to right-click on the trash and empty it from there. You actually have to go to the "Things" menu or use the shortcut "Shift - Command - Delete" (it's the same shortcut than in the Finder so that is good). One thing that will certainly be missing in the future is iPhone synching. Apple will most likely add iPhone synching to Mail's to-dos, but the chances of that happening with Things are slim. Overall, I would say it is 4/5.

A website without URL!

This is for both Tiger and Leopard. It doesn't work in Camino and Firefox, it only works in Safari. Sometimes when you are browsing on the web and you click on a link, the website opens in a new window that doesn't have any URL bar. It sometimes might be nice to see the URL so that you can know whether you were redirected or you are still on the same website, or you might want to bookmark it. It looks like it is hidden, but hitting "Command - L" will bring it up instantly:


Sunday, December 16, 2007

Copying and pasting in screen sharing!

There is so much more to screen sharing than you really see at first. Here is one of the great unknown features. One thing that, at first, I really wished was there, was the possibility of copying something on the remote computer and pasting it on my Mac. When you first load screen sharing from the Finder, all you really see is the other computer screen in a window. Screen Sharing is a full application however. To add the copy/paste feature:

1. When you are in screen sharing, go to "View" and choose "Show Toolbar".
2. A toolbar pops up with only three icons. The two at the right will let you exchange the content of the clipboard. The one on the left puts what is in your clipboard on the remote computer while the other one retrieves the info in the remote computer clipboard.


Saturday, December 15, 2007

Tip #2: Creating free ringtones now supported by Apple!

Don't forget to check out tip #1, posted earlier today.

There has been many way to circumvent the ringtones that Apple offers for the iPhone, but it is the first time that Apple officially offers a way of creating free ringtones. It is also the only way to create ringtones with songs that you created or any other sound that is not on iTunes. In the last GarageBand update, Apple added an option to create ringtones and send them to iTunes automatically. To do this, you will need GarageBand 4.1.1. Here is how it is done:

1. Create or import what you want to transform into a ringtone.
2. Cut it down if it is more than 40 seconds long.
3. Click on "Share" and choose "Send Ringtone to iTunes". The ringtone will be created and iTunes will load in the "Ringtones" section with your new ringtone that you are ready to sync to your iPhone.

Tip # 1: ForkLift is an application deleter too!

I will post two tips today because both don't apply to everyone. The first one is about the application Fork Lift (included in the MacUpdate promo). The main function of Fork Lift is really to be an FTP application, but it is also so much more. One thing that I was surprised that it includes is an Application deleter. One thing about OS X is that it is usually so easy to erase an application, that Apple didn't include any system function for uninstalling apps. Some more complicated apps don't include an uninstaller however. You can most of the time simply throw away the folder of that app that is in the Applications folder. Some useless files remain and take up space however. Here is an example, I chose in Fork Lift to erase "Google SketchUp". Simply erasing its icon in the apps folder will erase 97MB, but using Fork Lift Application Deleter will clear up 115MB of space. Fork Lift application deleter is the icon at the right of the toolbar:

Friday, December 14, 2007

Monitoring the state of your battery!

Laptop batteries usually degrade rapidly, but it's hard to tell unless you precisely calculate how much time it lasts every time you use it. I used to monitor it using a great application called CoconutBattery. It unfortunately doesn't work in Leopard and it hasn't been updated yet. I found this alternative that was updated recently called "Battery Health Monitor". You will get the "Original Capacity", "Current Capacity", "Current Charge", "Charge Cycles" and "Voltage". One thing to keep an eye on is the number of cycles. According to Apple, the battery should still provide 80% of its original capacity after 300 cycles. You can also check out the "Current Capacity". Depending on what that number is, you might be eligible for a free battery replacement if your Mac is still under warranty. The result for my MacBook came out pretty weird, I didn't know a battery with over a hundred cycles could have more capacity than the original capacity. You can get more info or download Battery Health Monitor here from MacUpdate.

Thursday, December 13, 2007

MacUpdate Promotion!

I rarely post about something else than Mac tips, but I think this promo is worth it. The MacUpdate promo includes 10 applications, worth $646.75, and is on sale for $49.99. The applications are ForkLift, RapidWeaver, Swift Publisher, Marine Aquarium, XSlimmer, Memory Miner, Yep, XMIND 2008 Pro, iStabilize and PulpMotion. I bought the bundle, I love it and I will probably have Mac tips related to that soon (I will most likely post two tips on these days so that I don't leave anyone out). You can get more info or buy this bundle here on MacUpdate.

Edit: SRS iWow was added to the bundle for free. It is now worth $666.74. You'll also get it if you already bought the bundle.

The backup schedule of Time Machine!

A great tip submitted by Dominic P. Tremblay: The backup schedule of Time Machine! I have to admit, looking at Time Machine's preferences, it is somewhat disappointing. I think Time Machine is really great, but its weakness is that it is not customizable in the slightest. Some third-party applications have started cropping up, changing that. There is a great one called "TimeMachineScheduler" that lets you change how much time there is between backups. It will let you set anything between 1 to 12 hours. You can download or get more info about TimeMachineScheduler here on the developer's site. Thanks for the tip Dominic!

Wednesday, December 12, 2007

Setting the time per slide of a Keynote presentation!

If you create a presentation that has slides that change automatically, setting this as a specific number of seconds is not convenient. The best is to actually try out the presentation and see. That is why there is a feature in Keynote called "Record". When you press Record, it plays the slideshow and you control it with the arrows or your Apple Remote and Keynote will automatically record the quantity of time between slides. To get this feature:

1. Right-click on the toolbar and choose "Customize Toolbar...".
2. Drag "Record Slideshow" to the toolbar.

Tuesday, December 11, 2007

Free license of DivX Pro!

Don't forget to check out the tip posted earlier today.

DivX currently offers the paid version of DivX, DivX Pro free for a limited time.  It will let you encode video as DivX.  The format is very efficient and useful when you store a lot of videos on your hard drive.  It is unfortunately not compatible with many Apple devices such as Apple TV.  You can get your copy at:

http://www.divx.com/dff/index.php?lang=en&version=mac

Searching more efficiently in the dictionary!

This is for the Leopard version of dictionary. The dictionary on Leopard includes searching on Wikipedia by default. This changed the way I use the dictionary because if you keep "All" selected so that it searches both the Dictionary and the Thesaurus, it will also search Wikipedia and slow everything down. The way I do it now is that I switch between Dictionary and Thesaurus to keep everything going fast. The disadvantage is that I have to use the mouse to switch. There is a very cool Safari-like keyboard shortcut however. Just like how you can access bookmarks in Safari, using "Command-0", "Command-1", "Command-2" and so forth, will switch dictionary instantly. It is obvious which shortcut goes with which, because it follows the order like in the top bar.

Monday, December 10, 2007

Podcast not updating?

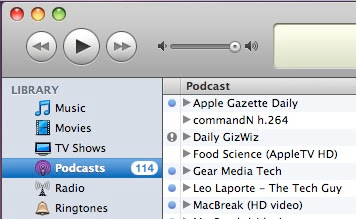
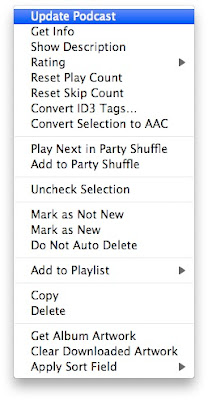
This is for both Leopard and Tiger. I think there is a bug in the way iTunes handles podcast updating, but there thankfully is an easy solution. It just happens after a while that new episodes of specific podcasts are not automatically downloaded anymore. Worst, you know there is a new episode, you click on "Refresh" in iTunes and it just doesn't refresh. That can happen when iTunes checks to see if there is a new episode, but the connection times out. A grey exclamation point then appears at the left of the podcast where you normally get a blue dot with a new episode. I think that is fine, but the bug is that when you hit "Refresh", it doesn't even try again. What I previously did was to unsubscribe and subscribe again. There is an easier way however. You can just right-click (or ctrl-click) on the podcast and choose "Update Podcast".


Sunday, December 9, 2007

Organizing threads in Mail!

Edit: It apparently also works in Tiger. Thanks Thomas Evan Lecklider!

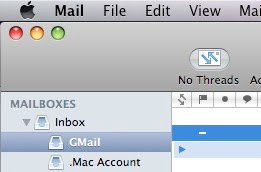
I believe this only works in the Leopard version of Mail. I don't have Tiger on hands to check. If you have ever used Gmail webmail, you know how organizing your emails by threads works. You basically start a conversation and the many replies are then included in one thread. I think it is cool, but I really want to use an application like Mail. Webmail is just never as good. A new feature in Mail 3 lets you do the exact same thing regardless of your email provider. To get it:

1. Right-click in the toolbar.
2. Choose "Customize Toolbar...".
3. Add the "Threads" button.
4. When you click on it, you inbox will automatically adjust, sorting everything by conversation. Clicking on the blue arrow at the left of a message (a message that contains many more) will let you see every email in the thread. What makes this even better than Gmail is that it is really easy to activate or deactivate it.


Saturday, December 8, 2007

Events in iPhoto!

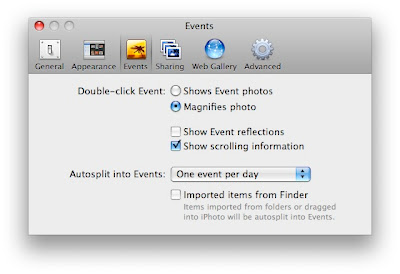
This is for iPhoto '08 and works in both Leopard and Tiger. When you are skimming through an event in iPhoto and you double-click on it, it will, by default, open up the event so that you can browse through all the photos in this event. It is however possible to modify this so that when you double-click on it, it magnifies the photo instead. It also adds a button "Show Photos" so that you can open that event just like it worked before. To change this:

1. Open the iPhoto menu and choose "Preferences".
2. Click on "Events".
3. Choose "Magnifies Photo" instead of "Shows Event Photos".

This is how it works:


This is where you can change it:

Friday, December 7, 2007

Playing video in VLC!

This is for both Tiger and Leopard.  VLC is really a great alternative to QuickTime and I use it all the time when QuickTime is having problem getting the right codec.  There is an interesting feature that I discovered that is similar to the behavior of DVD Player.  If you want to go forward or backward in DVD Player, there is a new timeline in Leopard, but I still often prefer using a keyboard shortcut.  The keyboard shortcut works both in Tiger and Leopard and is "Shift - Command - Right Arrow" for going forward and "Shift - Command - Left Arrow" for going backward.  What is news to me is that the same shortcut can also be used in VLC.  What I like about the way it works in VLC is that it doesn't look like the old-fashioned vhs fast-forward and rewind like in DVD Player.  It is actually possible to press "Shift - Command - Right Arrow" only once and it will move forward one minute.

Thursday, December 6, 2007

Zooming in DVD Player!

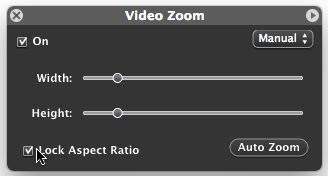
I only discovered this feature in the Leopard version of DVD player.  It might also be in Tiger, but I never used it and I don't know where it is (please post about it in the comments if it is possible in Tiger).  What this feature lets you do is zoom in on a movie in DVD player.  I find this useful because I sometimes have poorly encoded DVD that have black bars on the top and the bottom or on each side.  If your display doesn't fit the aspect ratio of the encoded DVD and black bars were included in the encoding, you end up with black bars all around and a smaller picture in the middle.  The zoom feature is available in the full screen controls, just above the timeline.  It is the third icon from the right.  It will let you zoom while keeping the aspect ratio or if you disable the "Lock Aspect Ratio", stretch the image (stretching the image is not really the best option).


Wednesday, December 5, 2007

Creating a keyboard shortcut!

This works in both Tiger and Leopard. There are a few improvements in Leopard though. It is possible to assign a keyboard shortcut to any command you find in the menu of any application. What is new to Leopard is that when you browse through the menu, you will actually see the keyboard shortcut you created. Here is how it is done (on Leopard, the Tiger instructions should be similar):

1. Open System Preferences.
2. Go to "Keyboard & Mouse".
3. Click on the "Keyboard Shortcuts" tab.
4. Click on the "+" to add a shortcut.
5. Choose the application you want the shortcut to be applied to.
6. Enter the command in the "Menu Title" text box. Make sure it is exactly like in the menu (include the "..." if necessary).
7. Choose the keyboard shortcut you want to apply to the command.
8. Click "Add"
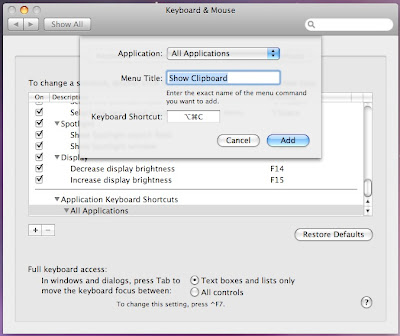

Before on Leopard:
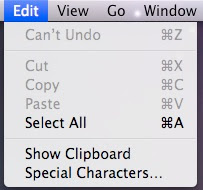

After:

Tuesday, December 4, 2007

Sorting on the desktop and everywhere in the Finder!

This applies only on Leopard.  I really only use this on the desktop, but if you are using icon view, it also works everywhere in the Finder.  What I really hate is when my desktop gets cluttered with files that are not sorted and in no logical order.  An option that solved a part of the problem in Tiger was "Snap to grid".  It would at least make sure all the icons were aligned, but it is now possible in Leopard, from the View Options, to have the files automatically sorted.  Here is how:

1. Press Command -  J to bring up the View Options.
2. In "Arrange By", select the way you want the files to be sorted.  I chose Name and with this, each time I add a file, it snaps it to the grid and it adds it in the right alphabetical order.

Sunday, December 2, 2007

The Safari mobile version of a website!

This works in both Tiger (Safari 3 required) and Leopard.  There was a tip previously about how to enable the Debug menu in Safari.  What was very useful about this is that it lets you change the "User Agent" so that the website you visit believes you are not using Safari.  The reason why it is useful is because some websites check to see if you are running Internet Explorer and will block you if you are not.  It is usually done because the website wasn't tested in other browsers.  Most of the times, the website runs just fine in Safari though.  The reason why I am bringing this up today is because there are a lot more options in the debug menu of the new Safari 3.  One of them that really pops up is in "User Agent" and it is "Mobile Safari 1.0".  By changing the user agent to the mobile version, all the websites you visit will think you are using an iPod Touch or an iPhone and when available, the iPhone version of the website will be displayed.  It can be very useful if you are working on doing this on your own website.  It will let you test how it really looks like without having to buy an iPhone or an iPod Touch.  Here is how you can enable the Debug menu in Safari 3:

Option 1:

1. Close Safari.
2. Open Terminal.
3. Paste the following line:

defaults write com.apple.Safari IncludeDebugMenu 1

4. Reload Safari and the debug menu should now be enabled!

Option 2:

1. If you don't want to use Terminal, you can also do the same thing in OnyX.  Check "Enable Debug Menu" in the Safari tab of the Parameters tab.  Make sure you have the latest version of OnyX which is supposed to add Leopard compatibility.

Truly deleting files from your Time Machine backup!

One thing that can be worrisome about a Time Machine backup is security. If you are working with confidential files and you want to make sure they are erased when you throw them away, you'll have to check your backup. It is however very easy to eliminate a file from the backup. When you are in Time Machine, you simply select the file you want to erase, click on "Action" and choose "Delete All Backups of "name of the file"".

Saturday, December 1, 2007

Printer software not quitting!

I don't know why but since installing Leopard, each time I print something, the printer software launches, but doesn't quit afterwards. It is quite annoying because I really have nothing to do with the printer software. There is an option that you can turn on that will put it back to a more Tiger like way of working. Here is how:

1. When the printer software is running, right click on its icon in the Dock (click and hold will do the same thing).
2. Select "Auto Quit".
3. That's it! The printer software should now quit automatically after it is done printing.

Brain Toniq. Clear the head fog
Pay Per Click Ads by pay per click advertising by Kontera