Google
 

The Ultimate Guide for switching from a PC to a Mac
(Part 2 - coming soon)

Saturday, June 30, 2007

Reversed pictures in Photobooth!

One of the thing that I only realized lately is that PhotoBooth actually captures the picture reversed (like in a mirror). You don't really see it most of the time. You can really see the problem if you are taking a picture of something that has text on. There is a nice option in the Photobooth menu that will let you flip the photo instantly. If you don't want to worry about that all the time though, you can simply choose "Auto Flip New Photos" from the Edit menu. You'll see the same thing than usual until you take the shot. It will flip it only when it is captured.

Friday, June 29, 2007

Taking a screenshot from Terminal!

Neither the shortcut, nor the application grab will let you take a screenshot if the application DVD player is running. I don't really understand the reason why it won't let you. There might be tons of possible reasons why you would want to do that. Also, why wouldn't it be possible if the DVD is your own home DVD? There is a way around this OS X limitation and that is to use the Terminal to take the screenshot. To do it:

1. Open the application "Terminal".
2. Copy and paste the following:

screencapture -i ~/Desktop/screenshot.png

3. That line would save the screenshot on the desktop. You can also choose another name instead of "screenshot.png". If you want it to save the file as a Jpeg, you can change the extension to ".jpg".
4. Once you wrote or pasted that line, press Enter. It will then let you select what you want to take a screenshot of.
5. That's it, the screenshot will be saved on the desktop.

Clipboard:

Instead of entering the path where the file will be saved, you can simply enter "-c" and it will copy it to the clipboard.

screencapture -i -c

Full screen:

You can also omit the "-i". This will capture the whole screen instead of just a selection. What is unfortunate about this option is that your Terminal window will appear on the screenshot.

Thursday, June 28, 2007

Hiding DVD Player!

When watching a movie or a tv show in DVD player, I often think of something I want to check on the web. I usually just hit "Space Bar" to pause and "Command-H" to hide DVD Player. One thing that drives me nuts is that when I am ready to get back to my DVD, I use "Command-Tab" to unhide DVD Player, but it is not in full screen anymore. I always thought that it was such a waste of time because when I want to unhide it, I always want it full screen just like before. Using "Command-0" (zero) makes it that much longer (especially since I always forget it is "Command-zero", I always mix it up with "Command-F" like in QuickTime). I recently found that there thankfully is a preference that you can set that will leave it in full screen when you unhide it. To enable it:

1. Go to DVD Player and choose Preferences.
2. Click on the "Full Screen" tab.
3. Check "Remain in full screen when DVD Player is inactive".

Screenshot:

Wednesday, June 27, 2007

Eliminating borders in iMovie!

Basic editing applications such as iMovie are missing quite a few important features that you can find in higher-end editing apps such as Final Cut Express or Final Cut Pro. Some of these features are still very useful to amateur editors however. One of the thing that I think iMovie lacks is the ability to Zoom in a bit in the case your source video is not perfect and you have unwanted content on the edges. There is a free iMovie plug-in that can add this feature: Eliminate Borders 3.0. Once you download it and install it, you can find the effect in the Editing tab. Within the Editing tab, it is hidden in the "Video FX" tab. The effect called "Eliminate Borders" is under "cf/x (universal)". When you apply it, you can click "Configure" and choose how much horizontally and vertically you want to zoom.

In iMovie:


The configuration:


You can download Eliminate Borders here from MacUpdate.

Tuesday, June 26, 2007

The Command-Tab, but backwards!

A great tip submitted by Tristan P-M: The Command-Tab, but backwards! Most of you know that very useful "Command-Tab" dialog that brings up all the open applications so that you can choose to which one you want to switch to. There are many ways of using this dialog to hide or quit apps (I explained how in a previous tip), but one that I didn't know is that you can also go backwards. I normally press "Command-Tab" and while holding "Command", hit "Tab" until I am on the right application. I usually do this very fast and I often press "Tab" once too many and I end up having to cycle through all the applications again. It is finally much longer (especially when you have about fifteen applications running all the time!). Well, the quicker way is to go backwards. After pressing the "Command-Tab" and while holding "Command", you can simply hit ` to go backwards (it is "ù" on the French keyboard). This is actually the key just over Tab, which makes it very convenient. Thanks for the great tip Tristan!

Command-Tab dialog:

Monday, June 25, 2007

Going to the address bar in any web browser!

When browsing the web, one of the thing that really makes things slower is using the mouse to go back to the address bar, highlight the address and type the new one. Bookmarks can partially solve the problem, but not all the websites you want to go to are bookmarked. It would just make sense if you could hit a simple key combination to highlight the address in the address bar and you would be ready to type the new one. There actually is one and it works in all Safari, Firefox and Camino: Command-L. Wherever you are on the web, you can just hit "Command-L" and you are ready to type the address of the website you want to visit.

Browsing the web:


Hit "Command-L" and:

Sunday, June 24, 2007

A New iPhone Tip Every Day!

No, that is not the new name of the website and I don't intend to split the tips half and half with iPhone tips either. So that is why I am launching the all new "A New iPhone Tip Every Day". The tips should be even better when I can get the real thing and try out the tips for real (on June 29th, I hope!)! A widget is also coming for "A New iPhone Tip Every Day". So take a look at this new website here! Don't forget to take a look at the tip posted earlier today!

Image editing without Photoshop!

This is a very nice free image editing application. There is a Pro version now, but the free version is still fully functional and most features are included for free. The application comes with tons of filters and special effects. The interface is very user-friendly and it lets you quickly adjust the colors, the exposure, the transparency and a lot of other options. The interface:


A Photobooth-like special effect:


The same picture in monochrome:


You can download Image Tricks here from MacUpdate!

Saturday, June 23, 2007

Selecting the first or the last file!

This is a great tip submitted by Rob Watts: Selecting the first or the last file! This will let you select either the first file in a folder or the last file. Within the Finder, in any window, you can hit "Shift-A" to select the first file and "Shift-Z" to select the last one. Here is the result on the screenshot:

First file:


Last file:


Thanks for the great tip Rob!

Friday, June 22, 2007

Changing the shortcut of the dictionary!

This tip is based on a question from Barbara MacLeod about how to change the shortcut that will give you a dictionary in every Cocoa application (doesn't support Carbon apps such as Microsoft Office and iTunes). I read in an article that it was possible to change the shortcut "Ctrl-Command-D" that brings up a dictionary (with the word your mouse is currently over). I found it interesting because I think that this shortcut is somewhat too long to be used on a regular basis. That mini-dictionary is in fact working with the regular dictionary because when you hit "More...", it brings up the full application. So that is where I looked, in the Preferences of "Dictionary". I realized that these shortcuts that apply to every application are not managed in single app preferences, but in the Finder System Preferences. To change the shortcut:

1. Open System Preferences.
2. Choose "Keyboard & Mouse".
3. Choose the "Keyboard Shortcuts" tab.
4. Scroll down to the "Dictionary". You will find "Look up in Dictionary" just under.
5. Double-click on "⌘⌃D" and enter the new shortcut that you want!


Thanks for letting us know this shortcut is customizable Barbara!

Thursday, June 21, 2007

Monitoring your computer temperature!

This is a great widget to monitor the temperature of your CPU, Hard drive and even the Ambient Air. It is called Temperature Monitor Widget 2.2. After installing the widget, you simply have to select the temperature of which sensor you want the widget to display. These are the kind of reading you can get on a Mac Pro (it works on all Macs but the sensors vary):


You can download the widget here from MacUpdate!

Wednesday, June 20, 2007

Leopard styled iChat!

This cool free iChat add-on might not give you everything the Leopard version of iChat gives you but there are still many Leopard exclusive features. You basically won't get the backdrops or iChat theater, but you can get great features such as tabbed chat windows and a lot of other customization possibilities. You can get iChat to set your status to "Away" automatically when the screen-saver starts, you can get Growl notifications, you can set a notification message when you quit iChat and there are still active conversations, you can auto-accept text invitations or incoming files (you can set to accept only files from a certain group to reduce the security threats) and you can get notifications in your Dock. The feature that really got me to download it is the tabbed chat, but I can tell you that I started liking all the customization options after a while. You can download Chax here on MacUpdate. Once it is installed, you can set the preferences in the iChat preferences. A new tab called "Chax" will be added in the preferences. Screenshot from MacUpdate:

Tuesday, June 19, 2007

Browsing a website without the mouse!

One of the thing that I found annoying on the Mac web browsers compared to the Windows web browsers is the ability to navigate through the links with the keyboard. Using the Tab key on Internet Explorer (Firefox for Windows and Camino for Mac as well), you can go from link to link. Per example, let’s say you are on the Google website, if you enter text in the text box and hit “Enter”, it will load the “Search” button. At first, it doesn’t look like there is an easy way of clicking on the “I am feeling lucky” button without the mouse in Safari. There is an easy way of doing this in Safari 3.0 however (I didn’t have the opportunity to check it on Safari 2, maybe it works). You can use “Option-Tab” and it will let you go from the text box to the “Search” button and to the “I am feeling lucky” button. You can easily see on which link you are because it will display a blue line around the link or the button. A great tip about upcoming Leopard features that you can get in Tiger now is coming tomorrow!

Monday, June 18, 2007

More efficient Spotlight researches!

Spotlight is one of the great improvement that came with Mac OS Tiger, but many features are not obvious from the start. I heard many complaints about the fact that it is not possible to bring up the full-featured spotlight research window without first searching in the basic drop-down menu and choosing “Show All” from that menu. There is actually a way of doing this that is built into the system. Most of you are aware that you can bring up the basic Spotlight drop-down menu with “Command-Space Bar”. Well to bring up the full-featured Spotlight window, you simply have to press “Option-Command-Space Bar”.

Sunday, June 17, 2007

Working with tabs in Safari, Firefox and Camino!

Tabbed browsing is really one of the greatest improvement in web browsing in the past years. Not having the headache of managing thirty different Safari windows is great (tabbed browsing would probably be okay with three windows, each with ten tabs). One of the thing that annoyed me most with browsing in Camino is the way Camino handles tabs. I found a fix to what bothered me and discovered that the same is true with Safari and Firefox, but reversed. It is pretty well known that holding down "Command" when clicking on a link will open the link in a new window or a new tab (if tabbed browsing in enabled). The feature is great except that Camino will open the page in a new tab and switch you automatically to this tab. I often end up in a website where I want to open three different links without opening them one by one and having to click back on the original tab to open the other links. In Camino, you can then hold down "Shift-Command" and click on the link to get the same behavior than Safari or Firefox (opens in a new tab, but you remain in your active tab). In Safari and Firefox however, you can also hold down "Shift-Command" when clicking a link to do the same than the default Camino behavior, open in a tab and switch to that tab.

Saturday, June 16, 2007

Quick application launching!

A great tip submitted by Josiah Turner: Quick application launching! This really is another application launcher but I feel it deserves to be mentioned! What I really like about it is its simplicity (I buy Macs because of the simplicity after all) and how fast it responds (faster than QuickSilver). It is called Namely. You can download Namely here from MacUpdate. The first thing I did once it was installed was to check the preferences to set the shortcut, enable the "Open on Login" and get rid of its Dock icon. That is one of the only complaint I have about it, there is no way to get rid of the Dock icon in the preferences. That issue can easily be resolved with Dock Dodger (download Dock Dodger here) and that is what I did right away. One of the thing that I really like about it is that it learns from your actions. The more you load a certain application, the higher up on the list it will be! Thanks for the great tip Josiah!

Friday, June 15, 2007

Creating a thumbnail poster!

This is a cool Automator action that will let you create a script to make a thumbnail poster in a few clicks. The Automator action can be downloaded here from Automator.us (two versions: iPhoto 5 and iPhoto 6). The script will create a PDF with up to 96 square images, 72 horizontal images or 72 vertical images. Once the action is downloaded and installed:

1. Open Automator.
2. Add the "Ask for Photos" action from the iPhoto actions.
3. Add the "Create Thumbnail Poster" from the PDF actions.
4. Choose the name of the poster the script will output and where it will save it.

Your script should now look like this:


5. Save the script. (I used Save As Plug-In and chose "Script Menu" in the "Plug-in for:" field).


The script should now be saved in the Script Menu. If you get it from there, it will open the nice iLife style dialog and let you choose pictures from your iPhoto library. As soon as you click "Choose", the script will create a PDF poster will all the thumbnails. The only issue is that you have to choose whether you want "Horizontal", "Vertical" or "Square" thumbnails while doing the Automator Script. What you could do to resolve this issue is save three scripts in the Script Menu, one with each setting. Thanks for the cool action Automator.us!

Thursday, June 14, 2007

At Work, at Home or on the go!

This is a very useful application that runs in the background without interfering in the Dock or the Command-Tab dialog. It is called MarcoPolo. What it does is it looks for certain networks or devices that will tell the application where you are. It will then adjust the settings accordingly. So you could set a rule that would say if your Mac is hooked up to this usb mouse, it is because you are at home. If it is hooked up to this cinema display however, you are at work. You could also have "On the go" settings so that your computer disables airport and bluetooth to save battery when it is not hooked up to the power. This could be a problem if you use wireless networking and you are on the battery at home per example. The app will let you solve this issue with more rules, you could set a rule that says that if your laptop is not hooked up to the power, it is on the go but with a "limited confidence". This would mean that it would require additional rules before changing your settings. You could then add another rule that to be on the go, you mustn't be hooked up to this network.

Some of the settings it can adjust are the default printer, the Mail SMTP server, turning on and off bluetooth or airport, and even running a certain script, document or application! I particularly like the default printer setting because when I press "Command-P", wherever I am, I am ready to hit "Enter" without worrying about which printer to use.

The settings:


Setting the rule to help the app figure out where you are:


Setting the actions that the app will take when the location changes:


You can download MarcoPolo here from MacUpdate!

Wednesday, June 13, 2007

Accessible download folder!

A great tip submitted by Devin Arbuthnot: Accessible download folder! I was watching the WWDC keynote and one of the new features of Leopard gave me an idea that is possible even in Tiger. Leopard will direct all your downloads in what is called "Stacks". The Stacks will be in the Dock and simply clicking on it will display all the files. There is a way to do something similar in Tiger. It is however much less elegant, but it still has the huge advantage of keeping you desktop clean. To do it:

1. Create a folder called "Downloads" wherever you want (I created it in my Home folder).
2. Drag that folder to the Dock, just beside the trash.
3. Change the settings of your web browser to direct all downloads there:
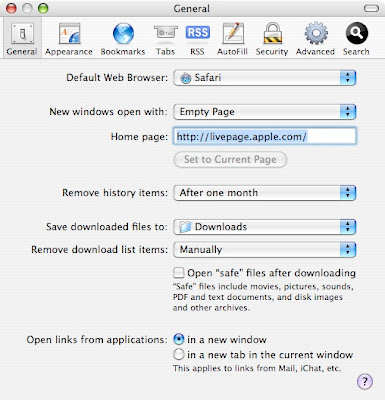
In Safari:
1. Go to Safari and choose Preferences.
2. In the General tab, go to the "Save downloaded files to:" and choose "Other".
3. Navigate through your folders to select the Downloads folder you just created.


In Firefox:
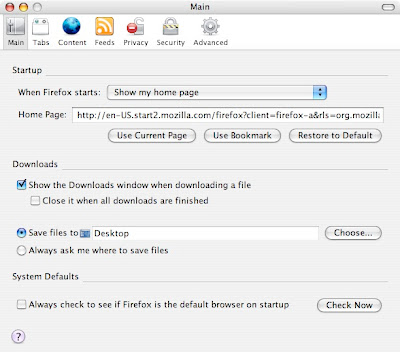
1. Go to Firefox and choose Preferences.
2. In the Main tab, go to "Save files to" and click "Choose".
3. Navigate through your folders to select the Downloads folder you just created.


In Camino:
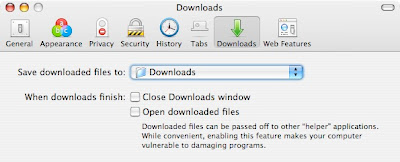
1. Go to Camino and choose Preferences.
2. In the Downloads tab, choose "Other" from the Save downloaded files to dialog.
3. Navigate through your folders to select the Downloads folder you just created.


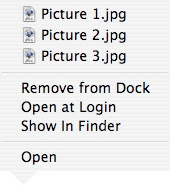
All your downloads will now be directed to that folder to keep your desktop always clean. To get a quick access to what you just downloaded, you can click on the folder on the Dock to open it. You can also achieve an effect similar to what is in Leopard by either "Clicking and holding" or right-clicking on the folder to bring up this menu:


Thanks for the great tip Devin!

Tuesday, June 12, 2007

One click access to apps or documents in the Finder!

This is a great tip submitted by Nessuno: One click access to apps or documents in the Finder! This is a really cool way of having a one click access to a file, a folder or an application that you use particularly often. It will let you load it instantly within a Finder window. It is pretty well known that you can add files, folders or applications in the left sidebar, but in the top toolbar, that isn't so common. It is however built right into the OS. You basically only have to drag the file or folder to the toolbar and wait a few seconds. It will then let you choose where on the toolbar you want to put it. It can go pretty much anywhere you want. I personally prefer having them either before the back/next button or between the path and the search bar. If you want to remove a file, folder or app from the toolbar, you can either right-click on it and choose "Remove Item" or choose "Customize Toolbar" to then be able to just drag off what don't want. Take a look at how it works:


This is how you add a folder:


This is with a different view:


Thanks for the great tip Nessuno!

Monday, June 11, 2007

Tip #2: Exporting Address Book Contacts!

This is the second tip today. Contacts in the Address Book would simply be that much better if it would be possible to export the whole list and import them into your web based email. Well a developer partially solved this issue by creating an app that will take all your contacts and export them into a format that is acceptable by GMail (and probably other email service providers, you'll have to check). There is also an advanced mode that let you select only a group within the address book. The instructions for bringing it into GMail are all included with the nice application called Address Book to CSV Exporter 1.3a. It can be downloaded here from MacUpdate. Don't forget to take a look at the tip posted earlier today!

Tip #1: Running a portable in clamshell mode!

There are two tips planned for today (the other one is coming later in the day)! A great tip submitted by both Nessuno and Joel Adria: Running a portable in clamshell mode! The clamshell mode is a way to run your laptop with an external display and an external keyboard and mouse. It can be very useful if you use your laptop as a desktop replacement or if you hook up your portable to an HDTV (it is great with Front Row). According to Apple, it is considered safe to operate the newer MacBooks and MacBook Pros and the PowerBooks in this way. Apple doesn't officially support doing this on iBooks (it may cause overheating). One of the best application to do that is InsomniaX 1.2. You can download Insomnia X here from MacUpdate. When InsomniaX is installed, you can simply change the settings in the menu of the app to an automatic sleep when the lid is closed or simply turning off the display. Insomnia will add an icon in your menu bar at the right, close to the airport and sound settings:


Thanks for the tip Nessuno and Joel! Don't forget to come back later today for another great tip!

Sunday, June 10, 2007

New Mail Notification in the Menu Bar!

This is a pretty cool add-on that will add Mail's main features in your menu bar. It is called ManilaMail. You can also very quickly see when there is new mail (very useful if your dock is hidden and you cannot see the Mail icon). It also gives you a quick access to retrieve new mail, to go to your inbox or to compose a new email. The app is great because of how simple it is. It doesn't add any icon in the Dock and if you don't want to have to worry about it, you can select "Open ManilaMail on login" in the Preferences. You can download ManilaMail here on MacUpdate.

Saturday, June 9, 2007

Looking up info about a song from iTunes on Google!

A great tip submitted by Oscar Meijer: Looking up info about a song from iTunes on Google! If you are looking for information about a specific song, Googling the name along with the artist is usually the easiest method. It can be done right in iTunes by using a shortcut located in the Services menu. It is "Search with Google". What is really cool is that if you highlight a song, and press "Shift-Command-L", it will open Safari (or your default browser) and search the name, the artist and the album of the selected song in Google. It is much quicker than retyping all that info! Thanks for the great tip Oscar!

Friday, June 8, 2007

Files stuck in the trash!

It happens a lot when cleaning the system and deleting a lot of files that the Finder just doesn't want to empty the trash anymore and says "The operation cannot be completed because the item "" is in use.". That's a good warning if it is true, but sometimes you want to get rid of an app and this warning appears even though the only thing running is the Finder. Usually I restart and I can delete it after. But that is very time consuming and even then, it is sometimes still stuck not wanting to be deleted. There is a risky command that can be used in the Terminal that will empty the trash no matter what. I say risky because a simple error in the syntax could erase a lot of stuff that you want to keep. There is a much easier and quicker way of forcing the Finder to empty the trash no matter what! It is done in the customization and maintenance application OnyX (download here on MacUpdate). Once you loaded OnyX and entered your administrator password, choose "Cleaning" in the top bar. Click on the "Trash" tab. You can now choose whether you want to "Delete" or to "Securely Delete" (by overwriting) and click Execute. That's it, it will force the Finder to empty the trash even if the files are in use!

Thursday, June 7, 2007

DivX Pro for Mac free!

It is not really a tip but I just thought I'd let you know about this awesome freebie. UneasySilence.com is offering DivX Pro free exclusively today. This will let you encode videos to the DivX format. You can get your free serial number by entering your email address here on the UneasySilence website. Don't forget to take a look at the tip posted earlier today!

Deep Sleep!

A great tip submitted by Nessuno: Deep Sleep! The current version of OS X only lets you entirely shut down your computer or put it to sleep. Deep sleep (or safe sleep) is supported on the latest PowerBook G4 as well as all the newer Intel Macs. What it basically does is it copies the content of the Ram to the hard drive and entirely shuts down the computer. The regular sleep option leaves everything in the Ram and brings just enough power to the Ram to keep the data. This is especially a problem when the power goes out and your computer is asleep. You lose everything that was loaded. With the deep sleep however, there is absolutely no power needed and it won't, even slightly, discharge the battery of your laptop. You can pretty much see what deep sleep is about when your laptop runs out of battery. Just before missing power, the laptop copies the info that is in the ram to the hard drive and when you hook it up to the wall and wake it up, it boots and reloads exactly where you left by retrieving the whole info from the hard drive. There is unfortunately no way of using the "Deep Sleep" option on demand. A great widget can solve this issue! It is called "Midnight" and it is a free download here on Softpedia! Thanks for the great tip Nessuno!

Wednesday, June 6, 2007

E-mailing a website or a link!

A great tip submitted by Rohit Deshpande: E-mailing a website or a link! Before, when I visited a website and I wanted to send that info to someone, I copied the address in the address bar, created an email, pasted the address and added some HTML to transform it into a link. Well there is a much easier way of doing it when using Safari and Mail. You can also send the whole website as an attachment in the e-mail. When you are on the website you want to send, press "Command-I". It will load a new e-mail in Mail and the website will be attached. It looks like this:


You can also press "Shift-Command-I" to create an e-mail with a simple link! Thanks for the great tip Rohit!

Tuesday, June 5, 2007

Closing tabs in Safari!

Most web browsers let you know when you are about to close a window that has many web-pages loaded in different tabs. This doesn't happen unfortunately with Safari. It happens much too often that I want to close a loaded web-page but I ended closing everything I searched for on the Web. Both Camino and Firefox let you know with a dialog before closing everything down. A developer created a Safari plugin that adds this dialog to Safari. Very simple and efficient! You must first install SIMBL to be able to install the Safari plugin:

1. Go to http://culater.net/software/SIMBL/SIMBL.php.
2. Download "SIMBL-0.8.1.tbz(Universal Binary)" in the upper right.
3. Double-click on SIMBL-0.8.1.tbz. It will create a folder on the desktop.
4. Open that folder and run the SIMBL installation by double-clicking on the "SIMBL" package.

Once SIMBL is installed, you are ready to install "SafariTabs 0.4.1".

1. Download SafariTabs 0.4.1 from MacUpdate here.
2. Close Safari.
3. Copy the downloaded file called "SafariTabs.bundle" to the Plugins folder located at /Library/Application Support/SIMBL/Plugins.
4. Restart Safari. If you try to close a window that contains many open tabs, that dialog should now pop up!

Monday, June 4, 2007

Rotating photos!

One of the thing that I absolutely hated about iPhoto is that unlike "Preview", there is only one "Rotate" button in the toolbar. It is possible to choose whether you want iPhoto to rotate clockwise or counter clockwise in iPhoto preferences, but it still takes time to change it all the time. What is happening is that when I take photos sideways, I always rotate the camera on the same side, but some friends and family rotate the camera on the other side. I end up with full rolls of pictures taken on one side and other rolls on the other side. Changing the preferences each time is much too long, so I resorted to right-click on the picture and choose "Rotate Clockwise" or "Rotate Counter Clockwise" from that drop-down menu. Well it turns out that there is a much quicker way of doing it. Watch the rotate button in the toolbar closely and press "Option". The rotate button will change direction! So you can set the one you use most often in the preferences and when you end up with a photo that needs to be rotated the other way, just press "Option" and click on that rotate button!

Sunday, June 3, 2007

Minimizing and closing windows!

A great tip submitted by Brandon J. Bowman: Minimizing and closing windows! Sometimes when browsing the web, I end up with a lot of windows open and there is often information that I want to keep for later. I usually just minimize all these windows one by one, but there is a quicker way! If you hold "Option" and click on the yellow minimize button, it will minimize every window in that running application (it works with every app). In the same way, you can hold "Option" and click on a minimized window in the Dock and it will maximize every window loaded in that application. You can also use the same tip to close windows, hold down "Option" and click on the red "close" button in the upper left. Every window in that application will close except those that are minimized in the Dock! Thanks for the great tip Brandon!

Saturday, June 2, 2007

iTunes organization and iPod Auto-Sync!

A great tip submitted by Kev: iTunes organization and iPod Auto-Sync! Instead of checking or unchecking every song one by one in iTunes or in an iTunes playlist, you can hold "Command" and click on one checkbox. It will automatically check or uncheck every song in that playlist. This is particularly useful if you auto-sync your iPod. The auto-sync feature will choose among the songs that are checked. You could either uncheck all the songs with this, create a playlist that you want the auto-sync feature to choose from and check every song in that playlist with the "Command-click". The opposite can also be done where you create a playlist of songs that you don't want on your iPod and uncheck them all with this feature. Thanks for the great tip Kev!

Friday, June 1, 2007

Publishing websites without .Mac!

Another tip about how to use your Mac without .Mac. iWeb was really created around .Mac and the one-click way of publishing a website is done with .Mac. iWeb is still a fantastic website design application and you can basically do everything without a .Mac account with the "Publish to a folder" function. Apple didn't really have the choice of including this kind of feature because they couldn't have advertised iWeb as a full application if it required a subscription. There are still a lot of people who buy .Mac because of this kind of one-click publishing that is much more elegant than being stuck with dealing with the FTP upload of the folder created by iWeb. A developer came to the rescue by creating this cool app that makes publishing to a server other than .Mac that much more easier. The application is "Easy iWeb Publisher 1.4". You just have to enter the FTP address with the username and password. There are many options, including per example the upload of only the files that changed. You can save this configuration and next time you upload, it will ask you to choose the configuration within a list of your websites. Screenshot:


Easy iWeb Publisher is a free download and it is available here on MacUpdate
.
Brain Toniq. Clear the head fog
Pay Per Click Ads by pay per click advertising by Kontera