Gigabit Ethernet is really the best way of quickly transferring data from one Mac to another. Wireless networks are very common and they are useful, but they are not as fast when transferring huge files (I transfer gigabytes of data daily and wireless, even n, is too slow). So the reality is when you want to transfer huge files, the best way is to get out the Ethernet cable and hook up the two Macs in a wired network. What I want to show you is a fix that took me a while to figure out. My Mac was simply stuck on 10 Mbit and it just wouldn't go to 1Gb. The problem is still there, but there is a workaround. First, here is how to network your Macs in a 1 Gb wired network:
1. Plug the Ethernet cable.
2. Disable Airport (if you have a wireless network) on one of the Mac to make sure the Finder won't try to communicate wirelessly.
3. This is an important step to insure you'll get a good speed: Open Network Utility on either one of the Mac. (Applications/Utility)
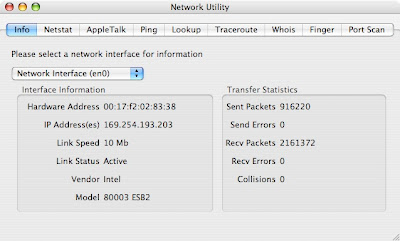
4. Check the connection speed of the Ethernet port (It is called Link Speed). Even though both my Macs have Gigabit Ethernet, they nearly always connect at 10 Mbit (very slow).
Not okay:
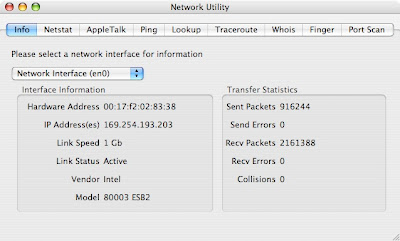
Okay:
If the Link Speed is not at 1Gb (and you are sure both your Macs have Gigabit Ethernet), there is a way of manually forcing it to use Gigabit. It is the only way I have found when it is stuck at 10 Mbit:
5. Open System Preferences.
6. Click on "Network".
7. Choose "Built-in Ethernet".
8. Click on the "Ethernet" tab.
9. From there, you can change "Configure" to "Manually (Advanced)" instead of "Automatically".
10. Once the configuration is on manual, you can easily change the speed to 1000baseT and click on "Apply Now". You can check network utility, it should now display 1Gb. What I have found is that once I forced it to go to 1Gb, I can switch back to Automatic. It will work fine for a while until it gets stuck on 10 Mbit again.


