Google
 

The Ultimate Guide for switching from a PC to a Mac
(Part 2 - coming soon)

Thursday, January 31, 2008

Automatic shut down with Handbrake!

If you don't like to leave your computer running all night but want to take advantage of this time where your processor is 100% idle to re-encode video, a great feature in Handbrake is for you. It also lets you do a whole lot more. You can choose specifically what you want Handbrake to do after the encode is over (sleep or shut down your computer). It will even let you switch to a Growl notification instead of the usual "Put that cocktail down.". It is located in the Handbrake preferences, under "When Done".

Wednesday, January 30, 2008

Temporarily changing the language of your OS!

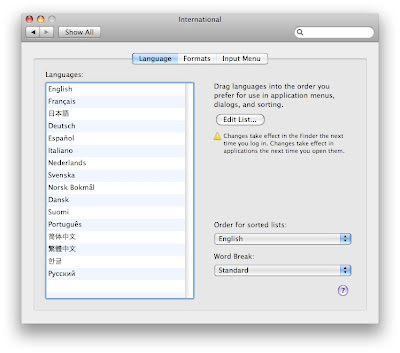
This is something that I really had no idea it was possible because Apple really doesn't lead us to believe it can be done. When I ordered my Mac Pro, I could choose not only the language of my keyboard (that is to be expected because it is hardware) but also of my operating system (in a separate section than the keyboard). When I received it, I realized it didn't really matter what language I chose because I can choose it when I install the OS. It is however much easier than that. You can actually switch it in System Preferences. You can even change it only temporarily. It can be very useful when making a presentation or if you lend your computer to someone else. Here is how you can change it:

1. Open System Preferences.
2. Click on International.
3. Drag the language you want your operating system to use to the top of the list. The change will only take effect when you restart your Mac.

Tuesday, January 29, 2008

AutoFill in Safari!

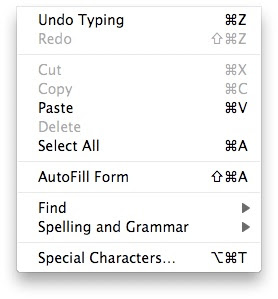
When you have the right preferences selected, Safari can auto fill passwords and a lot more information. It happens that the info just doesn't appear or it only appears when the page is fully loaded. To make things go faster, you can use the menu option "AutoFill Form". It is even possible to bring it up with the shortcut "Shift - Command - A".

Monday, January 28, 2008

Exposé and dashboard during a Keynote presentation!

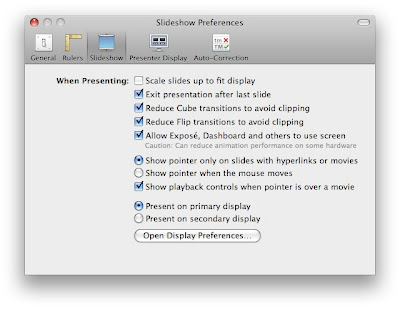
There is a great feature that you can enable in Keynote that will enable Exposé and Dashboard while a presentation is running. It is in the Keynote preferences, under "Slideshow". You can now switch to another application during a presentation and when you switch back to Keynote, it will resume exactly where you left off. It is also possible to use this to refer to a Wikipedia article in dashboard without interrupting anything.

Sunday, January 27, 2008

Measuring in Google Earth!

The ruler tool in Google Earth is very useful when you are looking at a certain area and you want to get an idea of the distance. There is a checkbox that really never attracted my attention before. It is "Mouse Navigation". It is enabled by default. What is great is when you are looking at a specific area and you disable this, you won't be able to pan anymore. It will let you measure without worrying about moving your current view:


Saturday, January 26, 2008

Viewing badly encoded video!

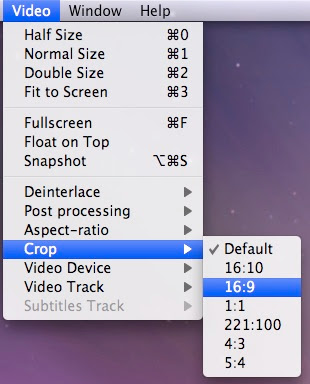
If you get a video file that includes black bars at the left and the right or at the top and the bottom that doesn't match the aspect ratio of your display, you'll end up with black bars on every side when you go full screen. Video really shouldn't be encoded this way because the computer is totally capable of adding the black bars according to the aspect ratio of your display. It is however possible to make the video watchable. Using VLC, you can crop the video on the fly to any other aspect ratio. If you choose the right one, it should remove only what needs to be removed.

Friday, January 25, 2008

Growl notification!

Growl is a free notification system for Mac OS X. It is extremely customizable and it is compatible with many different freewares and sharewares. It incorporates very well with Mac OS X and there are many different display styles. I find it very useful because FTP transfers take a while and I always do other stuff while it is copying. With Growl, as soon as it is done, I get a notification. A kind of notification that I can't stand is an icon bouncing in the Dock. The problem with the bouncing icon is that it interrupts my workflow, because I have to switch back to this application to stop it from bouncing. The Growl notifications disappears after a few seconds so I don't have to take care of it right away, but at least I know about it instantly. I find it is mostly useful with chat and FTP applications. I use it with Adium, Chax, ForkLift, Handbrake, Skype and Transmit. Once you start paying attention to the list of application that use Growl, you'll find a lot. You can download Growl here from MacUpdate.

Thursday, January 24, 2008

From your browser history to your bookmarks!

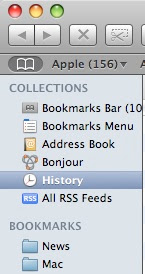
When you click on the open book that is at the left of the bookmark bar in Safari, you get the whole list of bookmarks. There is also a section in there for the History. I never really realized it was there and I only used the History menu. It can be useful for something completely different though. If there is a URL in your history that you would like to bookmark, instead of loading the website and going to "Bookmark this site", you can simply find it in this History section and drag it right over to the Bookmarks. It is that simple and it will even work offline.

Wednesday, January 23, 2008

The To Do from Mail in the dashboard!

I am not really sure why Apple didn't include something like this with Leopard. The To Do in Mail are nice, but I think there are just not separated enough. The widget called "To Do Widget" gives you a very polished interface for managing the to do from Mail. You can do everything from within the widget, even editing. It is a free download here from the developer's website.

Tuesday, January 22, 2008

Transferring emails to another mail client!

This is actually a simple way of transferring a few emails from one computer to another or from Mail to another application.  It will also let you preview the file in Quick Look (it doesn't work well in a text editor).  A lot of cool things can be done by simply dragging things around in OS X and the same is true with Mail.  You can easily drag an email from Mail to the desktop or any Finder window.  It will then be readable with Quick Look or just by reimporting it in any mail application.

Monday, January 21, 2008

Getting the highest quality in screen sharing!

In the Screen Sharing View menu, there are two possibilities, "Adaptive Quality" or "Full Quality".  I was on Adaptive Quality by default and I left it there for a while because it means that it is supposed to adapt to the quantity of bandwidth available.  The quality of the image I was getting was far from perfect however.  I assume it was because my network was not fast enough.  After a while, I took the time of trying "Full Quality".  The improvement was incredible.  Best of all, on a fast wireless n network like I have, there was no lag!  So if you are on a fast network, switching to Full Quality is a great improvement.

Sunday, January 20, 2008

Adding to iPhoto from the Finder!

One cool feature of Quick Look that wasn't really covered much is the possibility of browsing through photos in the Finder and simply clicking the "Add to iPhoto" button in Quick Look. It will automatically launch iPhoto and import the photo in a new event. It unfortunately doesn't work when multiple photos are selected so it really doesn't make it a batch importing tool. It can still be quick if you have a screenshot that you want to retouch in iPhoto or just a simple picture that you want to import.

Saturday, January 19, 2008

Open Recent in Word 08!

Word 2008 is a huge improvement over Word 2004 and it is not only because it is finally native on Intel Macs. There are loads of small but really cool new features. This one lets you access the "Open Recent" menu by clicking and holding on the Word icon. It only works when Word is already open, but it can still be a great time saver.

Friday, January 18, 2008

Shortcuts for mailboxes in Mail!

You might not know that Mail has shortcuts that are very similar to the ones for bookmarks in Safari. There was a tip previously about how to quickly access bookmarks in your bookmark bar with "Command - 1", "Command - 2", etc. In Mail, you can use the same shortcuts to switch from a mailbox to another. Here is the list:

Command - 1: Inbox
Command - 2: Outbox
Command - 3: Drafts
Command - 4: Sent
Command - 5: Trash
Command - 6: Junk
Command - 7: Notes
Command - 8: To-Do

Thursday, January 17, 2008

Shortcut for dialog boxes!

When a dialog box pops up in applications such as Safari, the shortcut is usually pretty obvious. "Enter" will be "OK" and "Esc" will be "Cancel". But, it does happen that some dialog boxes don't have the obvious OK and Cancel. One that annoys me in particular is the one to remember my password. I nearly always want to click "Not Now", but there is no obvious way of doing that. Even for that, the Esc shortcut works. In this case, there are three options, so you'll have to try it once to see which option will "Esc" do for different dialog boxes. It didn't make sense to me at first, because I always see Esc as a way of stopping a web page from loading, but it is really useful when you start using it.

Wednesday, January 16, 2008

Using your built-in portable motion sensor for a game!

I think this is a very innovative way of building a game. The game called Wally Bally uses the motion sensor that is built-in to every new portable Mac as controls for the game. The game is very simple, but I think it is more about the concept than the real game experience. I was surprised how precise the motion sensor is, because I know Apple only added this to protect the hard drive in case of a fall. The developer says it works on MacBook, but I assume it also includes MacBook Pro and PowerBook that have the motion sensor. The game unfortunately does require Mac OS X Leopard. The game is not in English, but it really doesn't matter. You can check it out here on MacUpdate.


Tuesday, January 15, 2008

New controls in iMovie '08!

iMovie '08 is not an application that I explore a lot because I nearly always use Final Cut Pro. But, it still happens that I just want to get something done really quickly and that iMovie is enough for what I am looking for. While doing a quick video for the web last week, I discovered something that I didn't know was in iMovie. I assume it is because it came with the 7.1 update and I just never really used it enough since then, but I still think it is pretty cool (cool enough to mention it as a tip!). Now, when you are skimming over a video in the timeline, six small controls appear. Four of them were already possible with other buttons: audio adjustments, video adjustments, crop and trim. There are two however, that let you precisely readjust the length of the clip, by trimming from the beginning or from the end. In the past, I reselected the whole clip by skimming and clicking over it and used the trim feature. This is much quicker and much more precise. The controls are the ones in the lower left and lower right corner of the clip when you skim over it:


When you click on it, it switches to this and lets you trim it just like in a pro application like Final Cut:


I also just want to remind everyone that tomorrow is the MacWorld Expo Keynote with Steve Jobs, so some great fun tomorrow with new products and maybe even new software.

Monday, January 14, 2008

Viewing folders within Quick Look!

A great tip submitted by Nessuno: Viewing folders within Quick Look! A really cool plugin changes the behavior of Quick Look. The way it works in the retail version of Leopard is it only displays basic info about the folder. With the plugin installed, you will get the same info, but you will also be able to see what is in the folder. Here is the difference:


You can get more info and download the plugin here (link to Flickr because the developer's site is not in English). Thanks for the tip Nessuno!

Sunday, January 13, 2008

Can TextEdit actually look like a real word processor?

TextEdit is really an application that we all forget is there and don't really think to explore how we can improve it. It is possible to make it look a lot more like a word processor. It is already a lot superior to Notepad on Windows because it is by default rich text. There is a way to have it display the whole page just like Word or Pages would. It is useful because it gives you a preview of what the formatting will look like once it is printed. Here is how it is done and how it looks:

1. Go to TextEdit and choose Preferences.
2. Check "Wrap to page".
3. Create a new project.

The preferences:

Before:


After:

Saturday, January 12, 2008

Viewing archived files within Quick Look!

A great tip submitted by Nessuno: Viewing archived files within Quick Look! This applies to Leopard only. There was a tip two days ago about how to search within archived files with Spotlight. Well it is also possible to view archived files, without unpacking them, with Quick Look. A plugin called BetterZip Quick Look Generator makes this possible. It is a free download here from the developer's website. Once it is installed, you can reload Quick Look by restarting your computer or more simply by going in Terminal and typing: qlmanage -r

Here is what Quick Look displays after installing the plugin:


The formats supported by this plugin are ZIP, TAR, GZip, BZip2, ARJ, LZH, ISO, CHM, CAB, CPIO, RAR, 7-Zip, DEB, RPM, StuffIt's SIT, DiskDoubler, BinHex, and MacBinary. Thanks for the tip Nessuno!

Friday, January 11, 2008

Reopening a window closed accidently!
I often work fast, especially with keyboard shortcuts so it happens often that I accidently close a window of the web browser. It is of course possible to simply reopen it from the History. Unfortunately, the one that I closed is not always at the top of the history. It might be a page that I loaded an hour ago. There is a very cool feature in Safari that reopens the last closed window. If the last closed window had several tabs, it will reopen all the tabs (although it is unlikely to close a window with many tabs because Safari warns you first). There is no keyboard shortcut assigned but you can create one in System Preferences (check previous tips). The feature is located in the "History" menu of Safari and is called "Reopen Last Closed Window".

Thursday, January 10, 2008

Searching through compressed files with Spotlight!

Spotlight lacks one feature and it is the possibility of searching through compressed files such as .zip. There is a great free plugin that solves this problem. It is called Ziplight Spotlight Plugin 1.2. What is great about it is that once it is installed, you don't even know it's there. You can continue using the same Spotlight menu as before. The only difference is that zipped files will appear in the result and it won't only be because of the title, but because of what is inside. You can learn more or download Ziplight Spotlight Plugin here from MacUpdate.

Wednesday, January 9, 2008

Saving your browsing session!

I often leave my web browser open just because I have some web pages open that I want to check out later.  Bookmarking them one by one is not really an option.  There is a way to save what is open in bulk.  

1. In Safari 3.0, go to "Bookmarks" and choose "Add Bookmark For These 3 Tabs...".  
2. Name the bookmark and save it.  It will create a folder with a bookmark for each tab that you have open.  If you later want to reopen them all at once, click on the bookmark folder and choose "Open in tabs".

Tuesday, January 8, 2008

Displaying names in Exposé!

A great tip submitted by megas88: Displaying names in Exposé! This works with Leopard and might work with Tiger (I haven't tested it). This is another cool unknown shortcut in Exposé. When you bring up Exposé and you mouse over a window, the name is displayed. If you press "Option" when Exposé is loaded, the names of all the windows will be displayed. Thanks for the tip megas88!

Monday, January 7, 2008

VoIP on a local network!

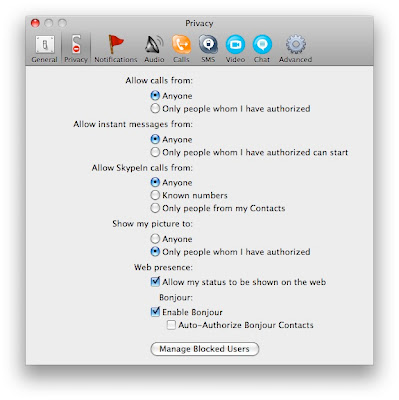
It is possible to use Skype to make calls over a local network without ever degrading your connection by going through the internet. The network sharing feature built-in to Mac OS X is called Bonjour and it is used in many places such as Printer sharing, etc. Skype supports Bonjour. To enable it:

1. Go to Skype, Preferences...
2. Click on the Privacy tab.
3. Check "Enable Bonjour".
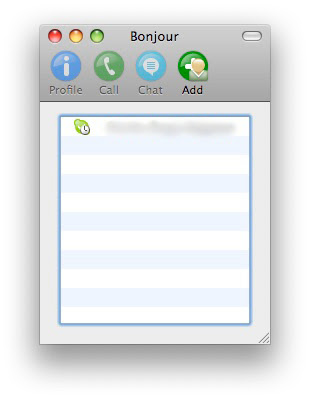
4. That's it! Skype will open a new window with a list of contacts that are currently online, but that are also on your local network (and also have Skype Bonjour enabled). Another interesting option is "Auto-Authorize Bonjour Contacts". It can be useful when you know you don't mind if anyone on your LAN wants to be a contact. It is particularly useful in a business environment.


Sunday, January 6, 2008

Bonus tip: First anniversary of A New Mac Tip Every Day

I have a bonus tip for today because it is the first anniversary of A New Mac Tip Every Day. It doesn't apply to everyone, but it solves a very annoying behavior with the Leopard upgrade. Not on all, but on a few Macs that I did an upgrade install, it wasn't possible to cycle through the open windows anymore. It might be an issue with other languages, because it only happened when I wasn't on the English keyboard. With Tiger, when you switch from one language to another, it changes the "Cycle Through Windows" shortcut automatically (Command - ` on the English keyboard). It does that because the " ` " is only present on the English keyboard. The problem with Leopard is that it doesn't change to accommodate other languages like Tiger did. I haven't found a complete solution yet apart from reinstalling completely (it is fine on the Mac that I did an Archive and Install). So here is what I did to at least make the shortcut usable:

1. Open System Preferences.
2. Click on Keyboard & Mouse.
3. Click on the Keyboard Shortcuts tab.
4. Scroll down to "Move focus to next window in active application".
5. Change the shortcut back to what you were using. It depends on what language you are using for your keyboard layout (it was "Commmand - Ù" for the French keyboard).


Don't forget to check out the tip posted earlier today!

Exporting from iPhoto to Flickr!

I had seen many commercial solutions that added Flickr export to iPhoto in the past, but this one is the first free one I found. It is only compatible with iPhoto '08. It is similar to the Facebook iPhoto Exporter. Once it is installed, you simply have to select the photos in your library and go to File, Export. The installer adds a new tab called FFXporter. The login is done in a web browser. You can check it out and download it here from MacUpdate.


Saturday, January 5, 2008

Solving Quick Look issues with a Leopard upgrade!

This tip solves an issue with the Leopard upgrade. In all demoes of Leopard, Apple showed off the possibility of bringing up Quick Look from the Toolbar. I mainly use the Space Bar for Quick Look, but I find the button useful enough when I am browsing the Finder with the mouse. I think there is an issue with the install of Leopard (might be solved in the latest retail version), because I tried both "Upgrade" and "Archive and Install" and in both cases, the Quick Look button wasn't added to the toolbar. Apparently it does work with a clean install. It is easy to get it back however:

1. In any Finder window, right-click on the toolbar and choose "Customize Toolbar...".
2. Drag the Quick Look icon or simply the default toolbar.
3. That's it! You now have two ways of bringing up Quick Look.


Friday, January 4, 2008

Quickly spotting hidden applications!

The "Command - H" or Hide a certain application feature is very useful to keep a lot of stuff open without clutter. It is however not easy to quickly see what is hidden. There is a great feature that you can enable that will make every icon of a hidden application in the Dock semi-transparent. You can then quickly spot which applications are hidden. The easiest way to enable this feature is with the free third-party application called OnyX. It was just recently updated to work on both Tiger and Leopard. You can download OnyX here from MacUpdate.

To enable it:

1. Open OnyX and click on the Parameters tab.
2. Click on the "Dock" tab.
3. Check "Use Transparent icons for hidden applications".

In OnyX:


The result:

Thursday, January 3, 2008

Applying iPhoto effects in batch!

Batch processing can really speed things up and it is the main reason why applications such as Automator are so great. iPhoto doesn't have any kind of batch processing capabilities, especially when it comes to editing photos. Being able to apply effects such as Enhance, Black and White, Sepia, etc, to a bunch of photos at once could be really helpful. There is a free third-party application that solves this. It is not a plugin, but a standalone application. To use it, you simply select the photos in iPhoto and switch to the application called iPhoto Batch Enhancer. You choose the settings in the app and click "Apply". You can download iPhoto Batch Enhancer here from MacUpdate.


Wednesday, January 2, 2008

Transferring playlists from one Mac to another!

I sometimes create playlists on my desktop and want to transfer them to my laptop, but there is no easy way of doing that. In the past, I just took the two iTunes windows side by side and recreated the playlist. There is an easier way however. Here is how you can transfer a playlist:

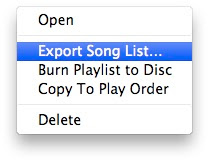
1. Right-click on the playlist you want to copy and choose "Export Song List..."
2. Use the XML file format and save the file.
3. Transfer it to the other Mac and open iTunes.
4. Go to file and choose "Import...".
5. Import the XML file.
6. The playlist should be created with exactly what you had on the other Mac. The links to the new path of the songs should work instantly. I am not sure if it would work with songs that don't have the exact same metadata from one Mac to the other. It worked great with podcasts and songs from the iTunes store and it really should be fine with every other songs (especially if the music on your laptop was copied from your desktop originally).

Tuesday, January 1, 2008

Giving a direct link to something on the iTunes store!

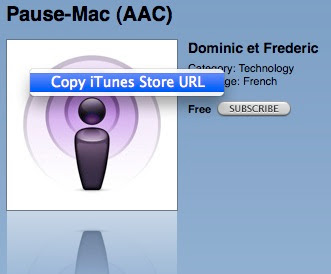
If you want to tell someone about a podcast, song, tv show, movie or anything on the iTunes store, you can use the "Tell a Friend" link from Apple that is everywhere on the iTunes store. If you don't want to go through Apple and prefer sending a simple and direct link, you can get the link by right-clicking on the artwork and choosing "Copy iTunes Store URL". The link can then be pasted in any web browser. The browser should ask if you want to load iTunes and once you say yes, it will automatically load the iTunes store at precisely the right location.

Brain Toniq. Clear the head fog
Pay Per Click Ads by pay per click advertising by Kontera