(Part 2 - coming soon)
Friday, February 29, 2008
Apple already offers pretty good RSS readers with Safari and Mail. A dedicated RSS applications can be useful and most of the time offers more features however. One that I particularly like is NetNewsWire. It really looks like a Mac application and it has that shiny iTunes look. It previously wasn't free but it is now a freeware. It has a great integration with applications such as Address Book, iCal, iPhoto and even Growl. When you find an article interesting, it will also let you load the web page directly in the application. It even supports tabbed browsing. You can learn more or download NetNewsWire here from MacUpdate.
Thursday, February 28, 2008
Quickly hiding the Dock!
Having the Finder automatically hide and show the Dock is really too much of a slowdown for me. Depending in which applications I am working in, however, I sometimes want to have it temporarily hidden. It is easy to do so with a quick keyboard shortcut. The shortcut "Option - Command - D" will turn hiding on and off. The same can also be achieved by right-clicking on the Dock, between the applications icons and the stacks, and choosing "Turn Hiding On". It is much easier than going to System Preferences every time you want to change this.
Wednesday, February 27, 2008
Disabling the downloaded applications warning in 10.5!
Mac OS X Leopard brought a new warning when you attempt to load a downloaded application. I think it is somewhat ironic of Apple to blame Vista of having "Cancel or Allow" and then to introduce this feature in Leopard. I guess it can be useful for users who don't know a lot about internet security. As a power user, I think it is just way too annoying. The way I see it is that there are currently no viruses for Macs and I am careful with from where I download files. I think Apple should at least include the possibility of disabling it even if it is enabled by default. Here is how you can make it happen (if you want, it is a "use at your own risk") (thanks to http://henrik.nyh.se/ for the script and the tip):
1. Download the "Unquarantine script" from http://henrik.nyh.se/2007/10/lift-the-leopard-download-quarantine (Direct link for the download here).
2. Copy the script to /Library/Scripts/Folder Action Scripts/.
3. Go to your account and right-click on the Downloads folder.
4. Go to "More".
5. Select Enable Folder Actions.
6. Select Attach a Folder Action...
7. Navigate through the Finder and select the downloaded script "Unquarantine".
8. That's it! You should no longer get the warning from anything downloaded to the Downloads folder. Of course, if you want this to apply to any other folder, you can do it by applying the folder action in the same way.
Tuesday, February 26, 2008
Deinterlacing in Handbrake!
I have to admit that I think Handbrake is really one of the most useful freeware available for the Mac. I think it is even better and more polished than many commercial applications. The presets included with Handbrake are perfect most of the time, but it happens that the source DVD is interlaced. Handbrake thankfully includes a deinterlacing feature, but it does slowdown the process and not all the source DVDs are interlaced. What I started doing was checking out the one frame preview that you get when you click on "Picture Settings..." and I only enabled deinterlacing when there was interlacing issues. It did happened that it was interlaced and it wasn't visible on the preview frame. The solution is that Handbrake lets you check out up to ten frames. You can switch the preview to another frame in the "Picture Settings..." by clicking on "Next" or "Previous". About what speed of deinterlace you choose, that depends on whether you intend to keep the final result for a while. I tried all Fast, Slow and Slowest, but I didn't really see a difference in quality that makes it worth the extra time for me. I usually get between 50-60 frames per second at Fast and around 5-6 frames per second at Slowest (Quad Mac Pro). No Deinterlace is about 10% faster.
Monday, February 25, 2008
Readjusting images in Numbers!
If there is something I really like about the closed Mac OS X system is how integrated everything is. You can see it once again in applications such as Numbers where it is possible to readjust and retouch photos just like you could in iPhoto. It is actually hidden with a lot of other features in the toolbar. To add it:
1. Right-click (control-click) on the toolbar and choose "Customize Toolbar...".
2. You can simply drag the "Adjust Image" feature to the toolbar.
3. That's it! You can now select an image, click on "Adjust Image" and use the advanced adjustments that you would normally find in iPhoto.
1. Right-click (control-click) on the toolbar and choose "Customize Toolbar...".
2. You can simply drag the "Adjust Image" feature to the toolbar.
3. That's it! You can now select an image, click on "Adjust Image" and use the advanced adjustments that you would normally find in iPhoto.
Sunday, February 24, 2008
Browsing other Time Machine disks!
I don't know if this is new to 10.5.2 or if it is because I needed the new Time Machine menu to notice it, but it is now possible to browse other Time Machine disks. I assume it works if you have done backups on multiples hard drives. It can be very useful to backup on different hard drives if you want to have a rotation and keep a hard drive out of your house/office. Here is where you can select which drive you want Time Machine to show:
1. Click on the Time Machine menu.
2. Hold down "Option", the "Enter Time Machine" should switch to "Browse Other Time Machine Disks".
3. You get a dialog box with a list of Time Machine hard drives hooked up to your Mac:
Saturday, February 23, 2008
Disabling the "Entered Text" warning in Safari 3!
Safari 3 brought new "warnings" when you close a window, much like most other browsers. I find it useful in certain cases such as when there are multiple tabs open, but the warning that comes up because there is text entered on a form really annoys me. It is possible to disable some of the warnings in the preferences of Safari, but not this one. It is however easy to do so in Terminal:
1. Close Safari.
2. Open Terminal.
3. Paste the following in Terminal:
defaults write com.apple.Safari DebugConfirmTossingUnsubmittedFormText 0
4. Reopen Safari and the change should be done.
If you want to revert this and go back to having this warning, you can do it by going through the same steps again but with a "1" at the end of the line you paste in Terminal instead of a "0".
Friday, February 22, 2008
Restoring purchased music!
The iPod isn't designed to give you access to the files so that it is not possible to just copy them back to your Mac if your hard drive fails or if you just want to have them on another Mac. There are many applications that will let you do that (many were mentioned here and in the comments), but this is not what I want to talk about today. Apple actually gives you a certain level of protection for purchased music. When you right-click on the iPod in iTunes, there is a "Transfer Purchases" option. What this will do is copy over all the music, videos, etc purchased from the iTunes store to your Mac or any Mac (probably PC too) that is authorized for your iTunes account. From my experience, it doesn't look like it creates any duplicate. I know third-party applications might be more flexible, but they are not as easy and elegant.
Thursday, February 21, 2008
Webcam support in MSN!
If you are coming from the PC world, you'll be disappointed to see that the Mac version of Microsoft Messenger doesn't support the webcam. There are many alternatives (iChat and particularly Skype) that I think are even better, but unfortunately, if your friends are on MSN, that is where you need to be. There is now one solution for getting webcam support for MSN on the Mac (excluding Boot Camp, Parallel and Fusion). It is aMSN. It really isn't as nice as Adium, but it does the job. In my experience, it isn't as stable as it should be but it is still fully useable. You can learn more or download aMSN here from MacUpdate.
Wednesday, February 20, 2008
Automatic software update download!
Since I got Leopard, OS X automatically downloads new software updates and only warns me when they are ready to be installed. I think that would be great if I had a super speedy internet connection. My high speed internet connection really suffers when it is downloading updates in the background and there is really no visible way of stopping the system from downloading these updates. It is however possible to disable the automatic downloads. Here is where it is done:
1. Open System Preferences.
2. Click on "Software Update".
3. Uncheck the checkbox next to "Download important updates automatically".
1. Open System Preferences.
2. Click on "Software Update".
3. Uncheck the checkbox next to "Download important updates automatically".
Tuesday, February 19, 2008
Creating an animated avatar with Photo Booth!
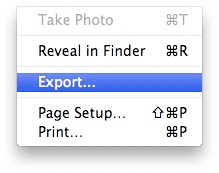
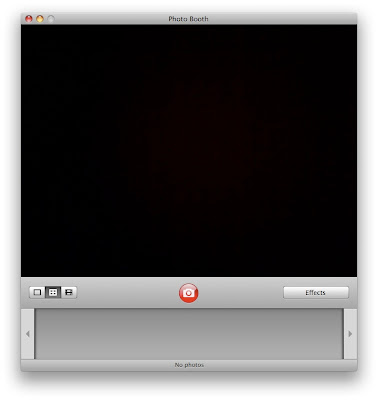
A great tip submitted by Julian Dye: Creating an animated avatar with Photo Booth! The Leopard version of Photo Booth includes the possibility of taking four shots very quickly. It looks good, but at first sight, there is not much you can do with it. It is however possible to use this to create an animated gif that you can use as an avatar. Once you have the pictures, go to the File menu and choose Export:
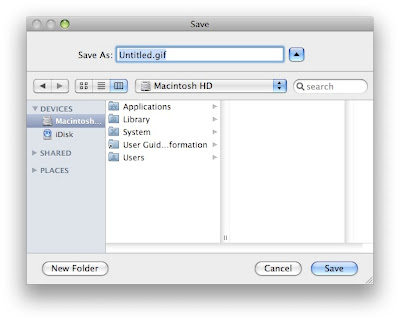
Export the file as an animated gif:
Thanks for the tip Julian!
Export the file as an animated gif:
Thanks for the tip Julian!
Monday, February 18, 2008
Keywords for Spotlight!
Searching with Spotlight works pretty well with text, but not so much with images. It is possible to solve that in iPhoto by adding metadata that can be used when searching. Not all pictures are in iPhoto however. A great way to do it is to use the Preview Inspector. You can add the inspector to the Preview toolbar or get it with "Command-I". In the Inspector, there is a section specific for Keywords. The keywords will then be used by Spotlight. You can add these to images and PDFs. I think it really improves the overall experience, because with time, I rely more and more on Spotlight and worry much less of keeping all the folders organized. Here is the Preview Inspector:
Sunday, February 17, 2008
The menu bar transparency is now optional!
The transparent menu bar in Leopard really wasn't accepted too well when it came out. There were many third-party applications to disable it. It is great to see that Apple listens, because the 10.5.2 update brought another new feature and it is the possibility of turning off the transparency. Here is where you can get this new feature:
1. Open System Preferences.
2. Click on "Desktop & Screen Saver".
3. Click on the "Desktop" tab.
4. There is a new "Translucent Menu Bar" checkbox.
1. Open System Preferences.
2. Click on "Desktop & Screen Saver".
3. Click on the "Desktop" tab.
4. There is a new "Translucent Menu Bar" checkbox.
Saturday, February 16, 2008
Combining PDF documents!
I wanted to get a PDF document made out of a few Word documents. My first idea was to simply copy and paste all the documents to combine them before printing it as a PDF. I guess I am not quite a Word expert, because it really affected formatting. I didn't want to have to redo the formatting so I decided to just deal with multiple PDFs. That was until I found the freeware called Combine PDFs. It is really simple to use. You just drag and drop the documents in the right order and press "Merge PDFs". You can learn more or download Combine PDFs here from MacUpdate.
Friday, February 15, 2008
Display a folder icon for Stacks!
There was a workaround a while back that explained how to avoid having Stacks that never look the same. Apple really fixed this in 10.5.2 and I think it is one of the biggest improvement in this update. There is now a new option that will let you choose how to display a stack. The options are "Folder" or "Stack". The "stack" looks just like it always did since 10.5.0, but the "folder" actually brings the folder icon look to the stacks. It can easily be changed by right-clicking on the stack:
Thursday, February 14, 2008
Time Machine in the menu bar or in the Dock!
The Mac OS X 10.5.2 update adds a Time Machine menu in the menu bar by default. I think it is nice, but somewhat redundant with what is already in the Dock by default. I kept both for a few days to see which one I prefer, because I really don't want to waste any menu bar or dock real estate. I finally settled on the menu bar icon. I think it looks like it is more part of the OS and much less like an app. If you want to get rid of the Dock icon, it is really easy, you can just drag it out of the Dock. It you want to remove the menu instead, it can also be done by going to the Time Machine preferences and unchecking "Show Time Machine status in the menu bar". Here is where it can be changed:
The new menu:
The new menu:
Wednesday, February 13, 2008
Converting videos for the iPod!
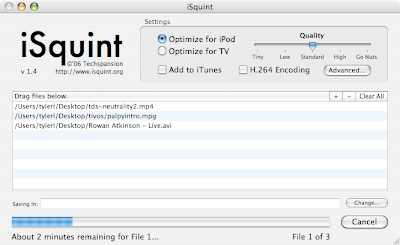
Converting videos for the iPod is something that is relatively easy with applications such as Handbrake. Unfortunately, Handbrake only works with DVDs or video_ts folders. I already used Handbrake for many videos, but I realized I used settings that were too high quality for the iPod. It didn't bother me because I was only watching them on my Mac, but now that I want them on my iPod, it really does. I thought it wasn't a problem because QuickTime Pro has presets for the iPod (and the iPhone). The problem is that QuickTime Pro is not very convenient. It takes an enormous amount of time and there is no queue. I found a part of the solution in a free application called iSquint. What I like about it is that much like Handbrake, you can create a whole queue of encodes that needs to be done. It is also pretty easy to use, you can optimize for iPod or for TV (still compatible with the iPod, but encoded at 640x480 instead). It is also slightly faster than QuickTime Pro (and free!). You can get more info or download iSquint here on MacUpdate.
Tuesday, February 12, 2008
Saving as .doc by default instead of .docx!
One thing that I found really annoying with the new Word 2008 is that it always wanted to save the files as .docx by default. The problem is that .docx files are not compatible with previous versions of Word and not everyone upgraded to the latest version. With .doc, you are pretty much certain that nearly everyone will be able to read it. It is possible to change the default behavior in Word's preferences. It is located in the preferences, under "Save". From there, you can select "Word 97-2004 Document (doc)" under "Save Word files as".
Monday, February 11, 2008
Searching through your browser history!
At first, when looking at Safari's history menu, there is no obvious way to search the history. I already mentioned, however, that it is possible to access the history through the bookmarks section (by clicking on the open book at the left of the bookmark bar). What is great is that this section has a search bar that lets you search through your bookmarks. But, what is even better is that it will also let you search through the history. It is a quick and convenient way of finding a website you already visited.
The search bar that lets you search through the history and bookmarks:
Sunday, February 10, 2008
Opening a file from a stack in a specific application!
Stacks are not quite like a Finder window, because it is not possible to right-click on a file and choose an application to open it in. There is still a way to force the Finder to open a file from a Stack in a specific application without even loading the stack folder in a Finder window. It works really well when the application you want to open it with is in your Dock. The way it is done is by simply dragging the file from the stack to the app. If the application is not one that is recommended by the Finder, the icon won't become highlighted, but you can still load it in this app by holding down "Option - Command" when dragging the file.
Saturday, February 9, 2008
New calendar or new calendar group in iCal!
I didn't even know it was possible to separate multiple calendars in group before discovering this shortcut. To create a calendar, you simple have to click on the "+" in the lower left corner. What was new to me is that if you hold down Shift, however, the icon will change to let you create a calendar group. You can then create new calendars within the group, or simply drag existing ones.
By default:
When holding down Shift:
A calendar group:
By default:
When holding down Shift:
A calendar group:
Friday, February 8, 2008
Disabling preview in FCP!
If you are editing on a laptop or on a less powerful Mac and you know exactly what you want to do, it is possible to disable rendering in Final Cut Pro. The shortcut is Caps Lock. It is very useful when working with complicated animations.
Thursday, February 7, 2008
Security options when printing to PDF!
The print to PDF feature of Mac OS X is one that I use a lot. I think it is so much more lightweight and useful then using the Acrobat. It is improved a lot in Leopard. It now includes security options. When you go to "Print" and choose "Print as PDF", there is a new button "Security Options...". What it lets you add is password protection. You can choose a password to open the document, a password to copy text from the document or a password to print.
Sorry about the late tip. There is a storm where I live and my high-speed internet just went down. I am posting this on dial-up (I think I only realize how slow it is when I am stuck using it).
Wednesday, February 6, 2008
Adjusting Spotlight for your Time Machine backup!
If there is one thing Apple forgot when creating Time Machine is that when you enable Time Machine, OS X should disable Spotlight search for the specific backup folder. The problem is that when I search for a file or an application, I sometimes end up with both results. The worse is for instance when I want to launch iTunes, I spotlight it, choose the wrong one, and it launches another one in the Dock, the one from the backup. It is possible to get around this. Here is how you can disable Spotlight searches on your Time Machine backup:
1. Open System Preferences.
2. Choose Spotlight.
3. Click on the Privacy tab.
4. Click on the "+".
5. Navigate to your backup disk and find the folder called "Backups.backupdb".
6. Click "Choose".
7. That's it. The backup should now be excluded from Spotlight searches.
1. Open System Preferences.
2. Choose Spotlight.
3. Click on the Privacy tab.
4. Click on the "+".
5. Navigate to your backup disk and find the folder called "Backups.backupdb".
6. Click "Choose".
7. That's it. The backup should now be excluded from Spotlight searches.
Tuesday, February 5, 2008
Syslogd maxing your processor at 100%!
There is a bug in Leopard that randomly affects the performance of your system. I was fine for a few months, but it started this week on my MacBook. I researched a fix for the problem and apparently it only happens if you have .Mac. It is a problem with the new Back to my Mac. What it does is it maxes one core. It is hard to notice on a quad or octo Mac Pro, but on a two cores Mac, it really affects performance. I don't really have the perfect solution. The only way I found of getting the performance back is to deactivate Back to my Mac. It is not much of a loss, because it never really worked anyway. I still hope it will be fixed in 10.5.2, but in the meantime, it is nice to know how to avoid losing processor performance. After deactivating Back to my Mac, you'll need to restart your computer or force quit syslogd.
Monday, February 4, 2008
Getting rid of duplicate songs in iTunes!
There is a really cool feature in iTunes that let you quickly check for duplicates and get rid of them. I sometimes copy music to my laptop from my desktop, erase it and copy it again. It happens especially often because my laptop hard drive is not always big enough. The thing is, I don't take the time to check each song one by one. After a while, you end up with duplicates that take even more space on your hard drive. To have iTunes display a list of all duplicates, simply go to the View menu and choose "Show Duplicates". You can then choose what to do with them.
Sunday, February 3, 2008
Pushing your Mac to the max!
HighLoad is a great application for detecting something wrong with your computer. It is actually being used by the Genius in the Apple Stores to find issues. It is especially good with intermittent problems. The application is not designed to give you the info about what went wrong however, but it can prove you that everything is going fine or you can check the logs to find precisely what's the problem. The application also lets you rebuild the Spotlight index and clear the system cache. You can learn more or download HighLoad here from MacUpdate.
Saturday, February 2, 2008
Fine-tuning the adjustments in Pixelmator!
With this great opportunity to get Pixelmator at an awesome price, I thought I'd post a Pixelmator tip today. When you make adjustments to an image in Pixelmator, let's say Hue/Saturation, you can make the rough adjustments by moving the slider with the mouse, but what if you want something more precise. It is possible to really do some fine-tuning by clicking on the image that is on either side of the slider. It moves the slider at just the right speed to achieve the perfect settings that you are looking for.
Friday, February 1, 2008
Pixelmator on sale!
I rarely post about stuff on sale, but I think this one is really worth it. Even though I use Photoshop daily, I often use Pixelmator since I have it because it is so much faster at what it does. I think it is useful for pros and especially the best choice if you don't need all the power of Photoshop. I bought it at full price ($59) because I think it is worth it, but now it is a real bargain at $29.99 from MuPromo. It is only a one day sale, so if you are interested, check it out here.
Don't forget to check out the tip posted earlier today.
The Mail app and Gmail!
This works on both Tiger and Leopard. I know this only applies to Gmail users, but a lot of people are using Gmail and this will greatly improve the way Mail handles your emails. I really liked .Mac Mail when I first started using it and the reason is that it syncs in a much better way than Gmail. If you use both the web and the Mail interface with your Gmail account, you probably often receive an email you just created on another interface in your inbox. It is terribly annoying. The main reason is that this is with POP. .Mac uses IMAP which works much better in this case. The great news is that Google added IMAP support to Gmail. That was a few months ago. The only problem is that the Leopard version of Mail automatically sets up your Gmail account using POP. Here is how you can avoid this and get the advantages of IMAP:
1. Add your account to Mail while making sure you uncheck "Automatically set up account".